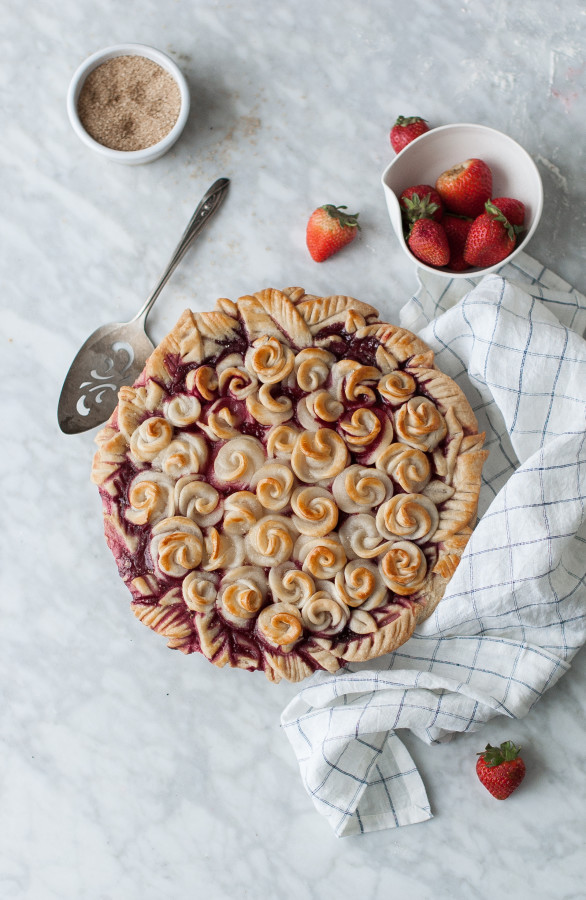
*This Rosy Rhubarb & Strawberry Pie is free of refined sugars, white flours, & cornstarch.
Sometimes I get rolling with a certain type of food and I just can’t stop. Such is the case with pie, recently. THIS pie started the whole “over the top, likely overly fancy pie crust” phase that I find myself currently submerged in. Ever since that pie, I’ve been dreaming up other elaborate pie crusts that I might bring to life.
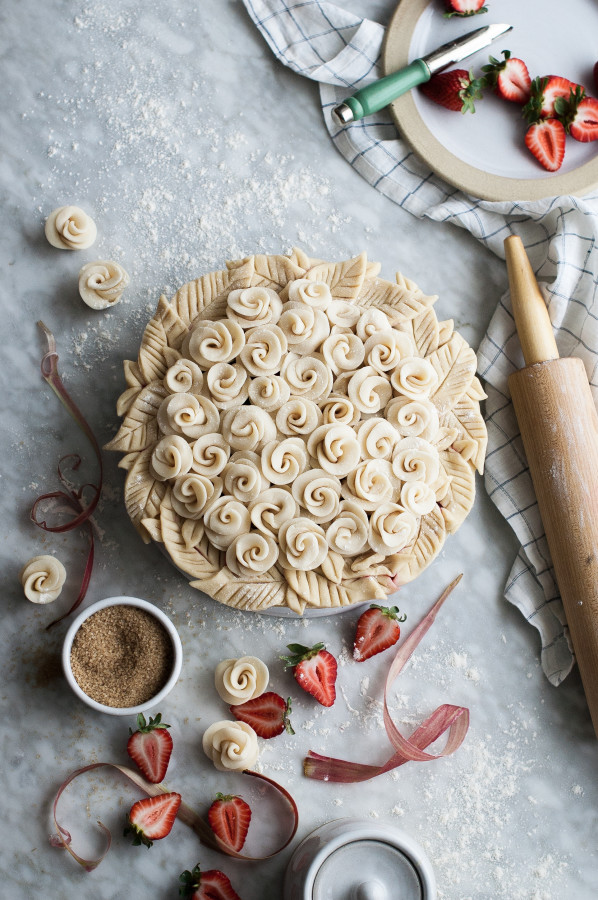
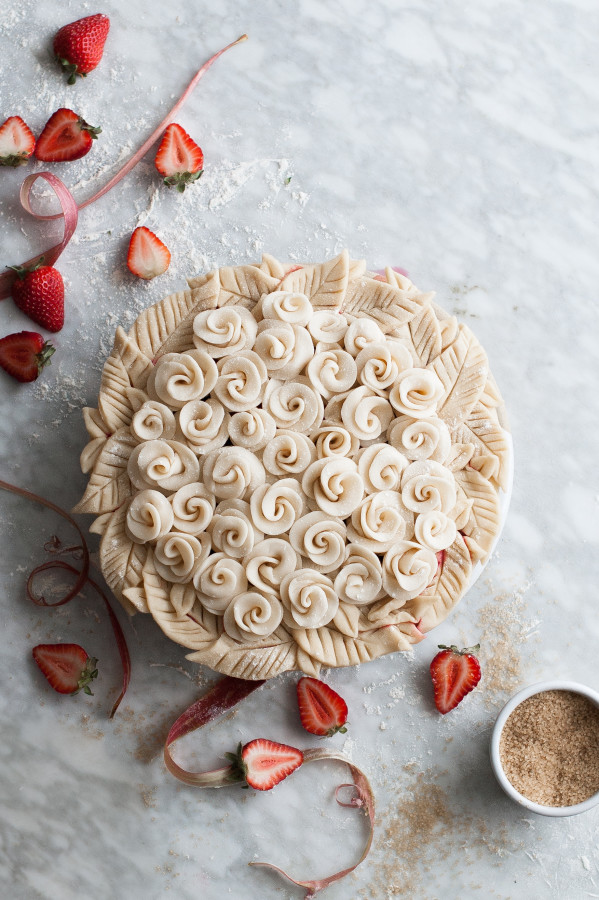
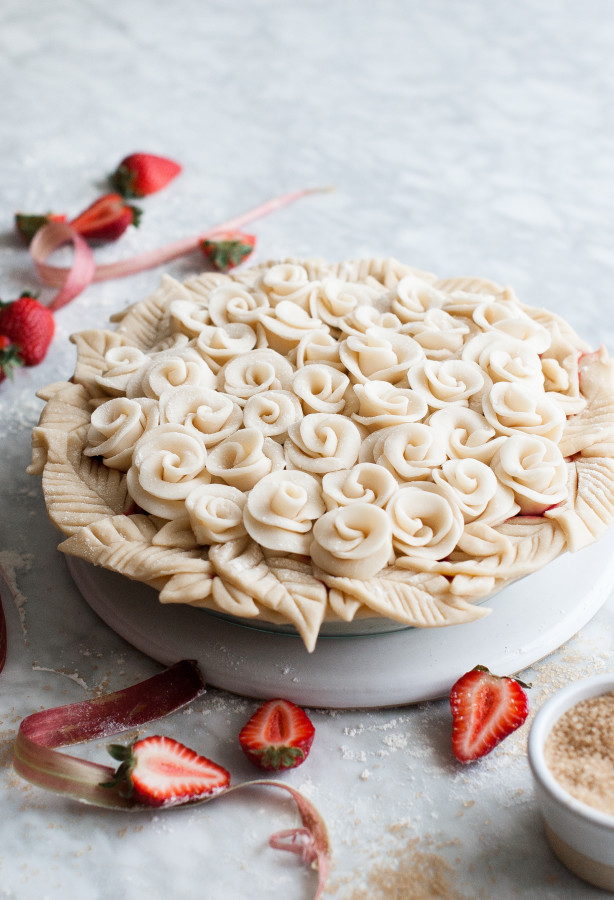
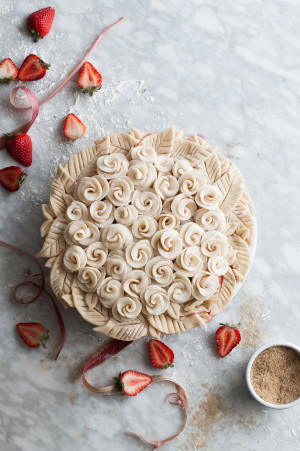
One of those crusts is this bouquet of roses. I made it for my Mom as her birthday dessert last week, but wouldn’t it be so perfect for Mother’s Day? Forget fresh flowers, make yours out of a buttery pie dough and fill it with one of the greatest pie fillings of all time: Strawberry Rhubarb.
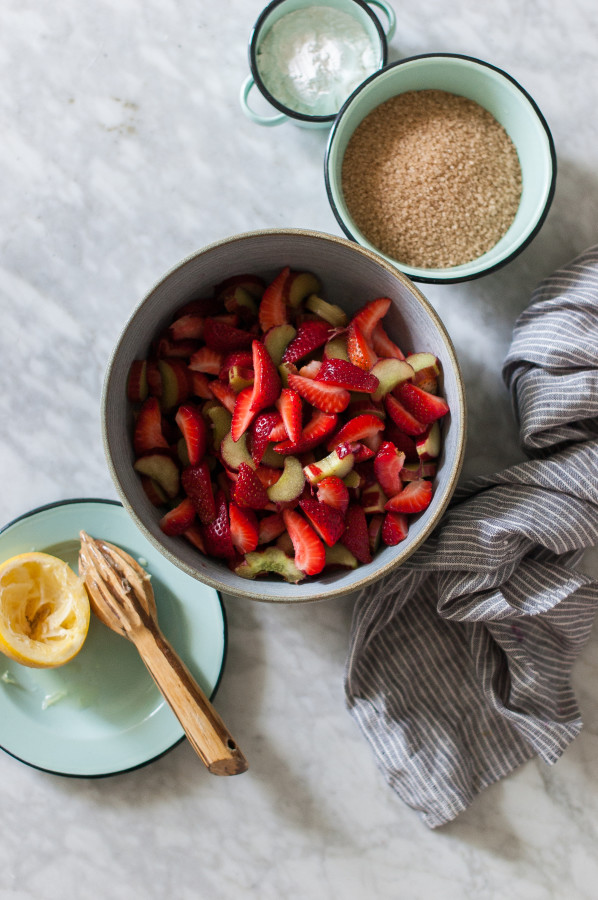
The filling itself is so simple. I’ve discovered that fruit-based pie fillings don’t need to be complex or heavy with ingredients. You really only need to sweeten and thicken. In the case of this strawberry rhubarb pie, the berries and rhubarb are sliced and tossed with turbinado sugar and tapioca starch. The turbinado sugar adds a depth of flavor to the cooked fruit that you can’t get with ordinary white sugar. The tapioca starch thickens the fruit syrup really nicely and has become ‘must have’ ingredient when it comes to baking fruit pies.
Make sure that you quarter your strawberries. Don’t leave them in large chunks or halves or you’ll end up with unappetizing mushy pieces that don’t break down into a deep red, sweet and sticky filling nearly as well as smaller pieces of strawberries will.
As for the rhubarb, select the smallest, thinnest stalks that you can find. They will hold their shape better and be less tough and stringy than large, thick stalks. Stalks that are a deep red will add to the beautiful jelly red syrup that you get with a strawberry/rhubarb combo.
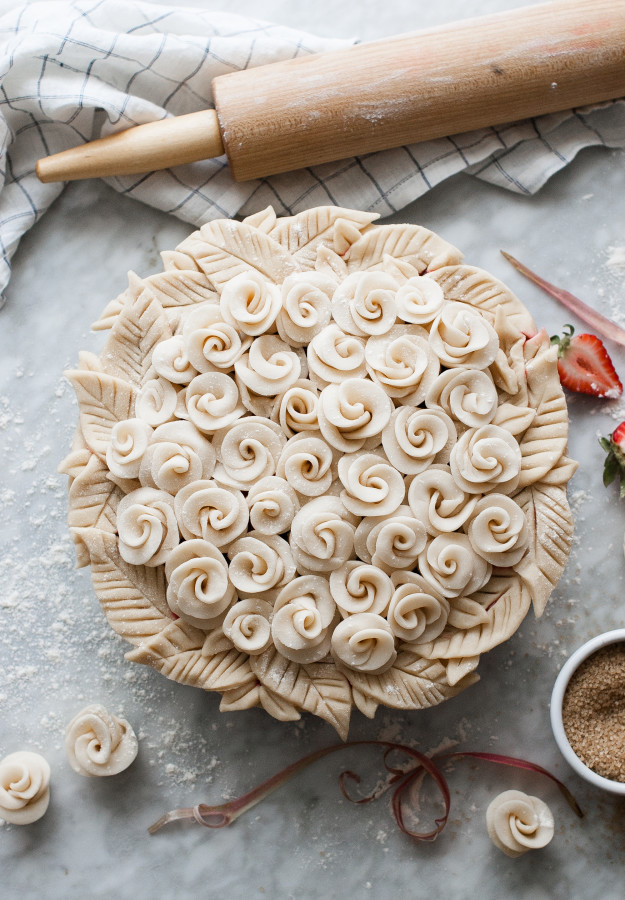
I know that many of you will roll your eyes when I say this, but the pie dough roses are really not difficult to make.
I promise. I’ve even got a video to show you just how to do it. What you really need to make them is patience. That, and a lot of pie dough. Essentially, you cut rolled pie dough into circles (LOTS of circles). You place four circles in a row on your work surface, with each circle slightly overlapping. The circles are then rolled up into a log, the log is cut in half, and the cut sides of the ‘log’ are pinched inward to hold the little rose together. After that, you turn the cut side down and use your fingers to press the folds of dough downward to look like rose petals.
It’s easier than it sounds, promise. Just watch the video and you’ll be ready to make thousands of dough roses yourself. Or at least a few dozen.
Tips:
*Chill your pie dough roses before putting them on top of the filled pie. This will help them to keep their shape better as they bake. If you don’t want such a thick pie crust, snip the bottoms of the roses off before placing them on top of the filling. They will still hold their shape if you are gentle, but your crust will not be so bulky.
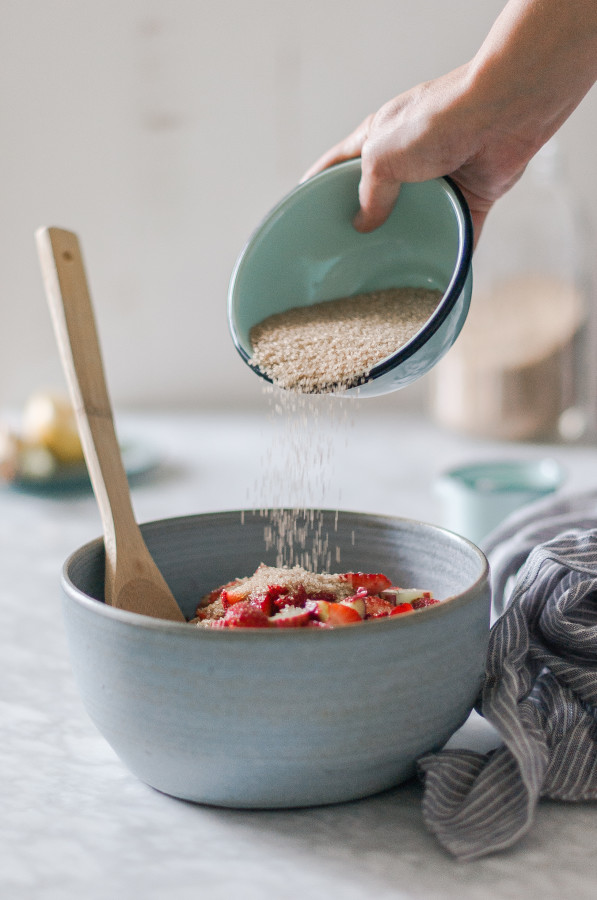
*Toss your pie filling ingredients together just before placing in the pie crust and baking. This will give the filling less time to become liquid-y from the sugar extracting the juices so that the filling will be less likely to run out of the pie crust before it is set.
More Pie:
Triple Berry Pie with a Leaf & Vine Crust
Blueberry Pie Ice Cream Sandwiches

Pie Dough Roses from Kayley McCabe on Vimeo.
- FOR THE CRUST:
- 2½ cups White Whole Wheat Flour
- 3 tablespoons fine Cane Sugar
- ¼ teaspoon Sea Salt
- 1 Vanilla Bean
- ¼ cup Shortening
- 12 tablespoons (1½ sticks) Butter, cold and cut into small cubes
- ¼ cup + Ice Water
- FOR THE FILLING:
- 2 medium sized Rhubarb Stalks, sliced
- 1 lb. Strawberries, quartered (stems removed)
- Juice of ½ a large Lemon
- 1 cup Turbinado or Demerara Sugar
- 5 tablespoons Tapioca Starch
- 1 egg, beaten
- FOR THE CRUST:
- Place the flour, sugar, and salt in the bowl of a food processor fitted with an 's' blade. Scrape the seeds of the vanilla bean into the bowl, close the lid, and pulse the mixture a few times until blended together.
- Add the shortening to the food processor and pulse once. Add the cubes of butter, one at a time, pulsing a few times after the addition of each cube.
- With the processor running, drizzle in the ice water until the mixture starts to form into large clumps. Do not add too much water. Dough should not be sticky or wet, but should come together to form a nice dough.
- Divide the dough in half, wrap up one half and set aside.
- Roll the other half of dough into a ball and place in between two sheets of parchment paper. Roll to a circle that is 1½-2 inches larger in circumference than your pie dish.
- Place the sheet of dough over the top of your pie dish and remove parchment paper. Press the dough in to fit the bottom and sides of the dish. There should be a little bit of dough left hanging over the edges. Trim dough around the edge of the pie. Re-roll the dough scraps to ⅛". Refrigerate dough for 15 minutes. Cut leaf shapes out of the dough and place around the edges of the pie, brushing the edges with beaten egg to help them stick.
- Place the crust in the fridge and make the pie filling.
- FOR THE FILLING:
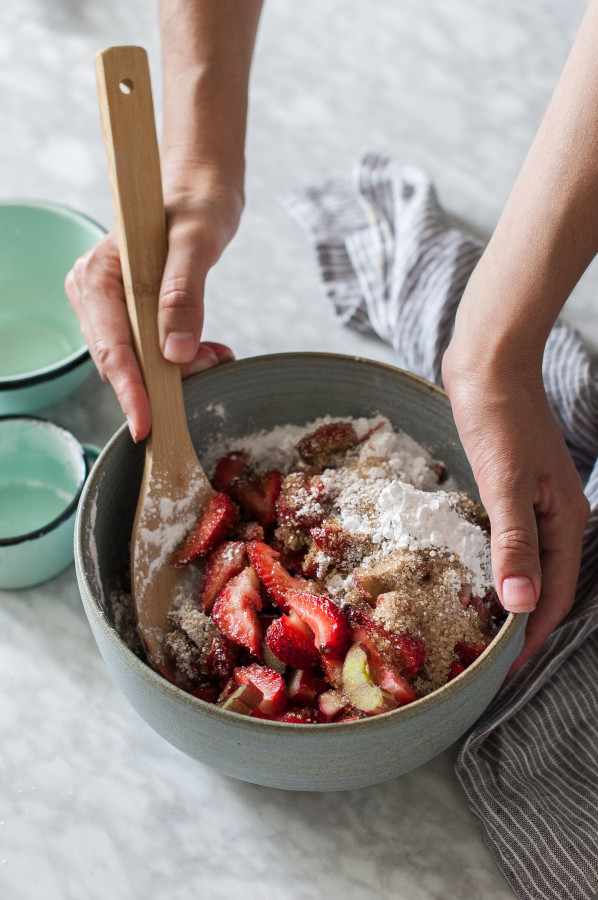
- Place the rhubarb, strawberries, lemon juice, tapioca starch, and sugar in a large bowl. Toss to coat - tapioca starch should dissolve.
- Spoon the mixture evenly into the dough lined pie dish.
- Place the remaining half of the pie dough in between two sheets of parchment paper and roll to a thickness of 1/16". Place in the refrigerator for 15 minutes.
- Remove from the fridge and cut circles about 2" in diameter out of the dough. Cut as many circles as you can, re-rolling the scraps and cutting more circles until all the dough is used up.
- Lay four circles on your work surface, with each circle overlapping the next. Starting at the end of a dough circle, roll up the dough into a log shape (all circles will be rolled up together). Cut the log in half. Use your fingers to press the dough on the cut side into the center to keep the dough rose sealed together. Turn the dough rose over and use your fingers to gently press the folds of dough out and down, into the shape of petals.
- Repeat with remaining dough circles until you have used all the dough.
- Place the roses on top of the pie filling until the top of the pie is completely covered in roses.
- Brush beaten egg over the top of the pie crust.
- Cover the top of the pie with a loose layer of tin foil.
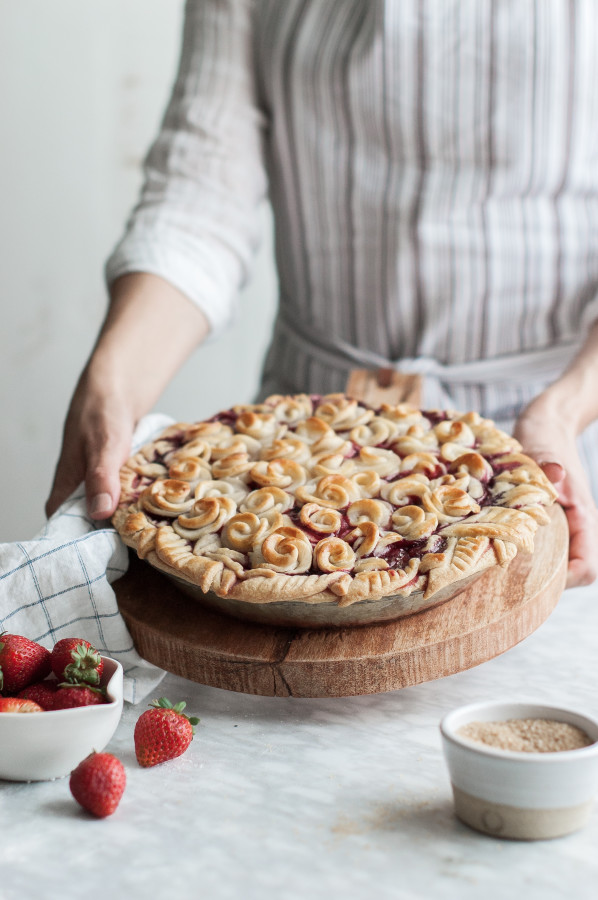
- Bake on the middle rack of an oven at 375 degrees for 45-50 minutes.
- Remove the tin foil and continue baking the pie until the filling is bubbling. The center of the filling should be thick and gel-like.
- Remove from the oven and let cool.
- Serve warm or at room temperature.
OH this is stunning! So beautiful, and my mouth is watering!
Thank you so much for your nice comment! 🙂
I don’t have words for how beautiful this pie is. Just beautiful. It is spring in food form!
Thank you Ivonne!:)
Holy cow, this pie has me stunned speechless with its perfection! I couldn’t possibly love this crust any more!
Thank you so much, Tori! I’m glad you like it! 🙂
Excelente video!! it´s amazing how easy is to make the roses!! Thanks for sharing it with us!
Love from Argentina!
Marisa
Thank you Marisa! I’m glad you found the video useful! 🙂
This pie is absolutely stunning! Rhubarb is a wonderful ingredient to use in the springtime.
Thank you Laura! Isn’t rhubarb wonderful?!
This is amazing! I am so happy that I found your page, you have such talent :). Thank you for sharing the idea of how to make these roses, so easy :).
I have a question regarding the crust, can it be mixed with hand?
Best regards from Holland 🙂
Thank you Monica! I’m so glad you like it! 🙂
You can definitely mix the crust by hand. I’m just lazy and throw it all in a food processor 😉
What a beautiful beautiful blog! Simply superb.
Thank you Monique! I appreciate that! <3
May I ask where you got the cool leaf cutter? I’ve been trying some fun pies and would love this cutter.
Your pie and pictures are gorgeous! I actually just tried this recipe today and just pulled the pie from the oven. I plan to blog pictures of it sometime. 🙂 It was fun to make!
Hi Deborah! I’m not sure where the leaf cutter is from, but it’s just a basic leaf shape…the lines of the leaves I carved in with the back of a knife. I saw the picture of your pie on instagram, it turned out gorgeously! =)
This is the pretties pie ever. I’m going to try this soon, your video illustrated how to make them perfectly. Thank you!
Thank you Carrie! I’m glad the video is helpful! =)
This is lovely! And the video is very helpful. Question on making the crust. You directions include scrapping out a vanilla bean. However, the list of crust ingredient does not mention vanilla beans. How many should be used?
Thank you Shannon! And thanks for pointing out the missing vanilla bean – fixed!
gorgeous. love this pie and your blog. for some reason i am having issues with loading the pages!!
Hi Kayley! So lucky to have found your site!! Should I (or may I), refrigerate the dough after dividing in two and before rolling out the base crust of the pie? This is the first pie I am baking 🙂
Thank you!
Alicia
Hi Alicia!
You can refrigerate the dough before rolling, it may just be a bit harder to roll. I roll it as soon as I make it(between parchment paper) and it turns out perfectly but refrigerating would be good too 🙂
Hello , your blog is really nice! I was looking for something to bake over the holidays and your recipie was easy and simple I’m only 14 and I can make it and it looks great when baked in the oven, thankyou for publishing this lovely recipie and I look forward to trying your other recipes in the future ?
Gosh this is just so beautiful! Very clever…off to follow you on insta ☺
Thanks so much, Tania! xo
amaaaaaaaazing!!! and awesome video tutorial!
You are absowowlutely amazing! I am going to be the queen of the barbecue when I step in with this beauty! And the rose video, you are an angel! Thank you =)
Aw, thank you so much for the sweet comment, Allie! I’m glad that you found the video helpful!
I really like your work surface! Can I ask, what is the material used? And your striped towel… And of course that amazing pie art!!!!! Thank you so much for sharing with us how to do it, too!
Thank you Kimberly! The surface is marble and the towel is by Farmhouse Pottery =) https://www.farmhousepottery.com/
This pie is perfection, you are a genius. Really, this is the most beautiful pie I have EVER seen. I can see this on the cover of any magazine, brilliant. Congrats, can’t wait to see what you come up with next.
Aww, thank you for the kind comment, Lynda! You are so sweet! xo
Hi Kayley! Your pie is spectacular! It should be on the cover of a bridal magazine with a pie table story! Its gorgeous and inspired me. I have been playing with delicate subtle flavors of rose water and lavender, lemon and marzipan (not together!) But seeing your roses bouquet pie, made me go another round with an almond vanilla pie filling with rose flavored crust. Help me. What do you really think?
I’ve been invited to a wedding and it is BYOP!! Yes! Bring your own pie!! I would love to bring this pie. Do you think I could freeze it? At what point would I freeze it?!! Thanks!sa
Your picture is on instagram with no credit on bakeitfun feed fyi.
It is a beautiful piece BTW ?
I am looking for ideas for my daughter’s wedding pie (she is not a cake person) and this is lovely. Thanks for the video-it makes it look easy! Will be giving it a try this weekend to see if she likes the results. Crossing my fingers, as I will be making this in a kitchen not my own!
Do I put the roses on unbaked pumpkin pie??
They would sink if you put them on top of the filling unbaked…I would bake the roses and pie separately, then put the roses on after baking 🙂
I made a apple pie for thanksgiving using my recipe for a crust. Yes while beautiful for my fist attempt the top crust was quite thick. Believe I’ll try homemade pastry crust next time. Oh and full credit was given for yr beautiful idea. Ex professional baket.
This pie crust is AMAZING! I searched through so many pins to find it but, it was well worth it! Your blog now espouses all cooking goals. Thank you!!!!