*This Triple Berry Pie is free of White Sugars, White Flours, & Cornstarch.

I adore a good pie.
Who doesn’t, really?
My favorite thing about pie? The crust. I know, many of you are shaking your heads thinking “but the filling is the best part!”. And I like pie filling, I really do. But the honest truth is that the pie crust is what I come to the table for. Strange, really. I can’t stand bread crust. But I’d eat a whole pie crust, sanz filling, if it was put in front of me. I’ll even tell you a dark, shameful secret: Sometimes I scrape the filling out of the pie entirely, douse the crust in cream, and go to town.
So If I’m going to make a pie, the crust needs to be amazing and the filling even better, you dig?
This pie crust is perfect. Flaky, buttery, and just right thickness (for a crust addict).
I don’t like to get fussy with pie crusts. I always make them in the food processor and it’s a quick gig. Maybe 5 minutes start to finish. I mean, rolling out the dough and decorating the top of the pie takes long enough, why spend forever making the dough, too? That’s my pie-motto.
Easy to make dough, complicated crust decorating 😉

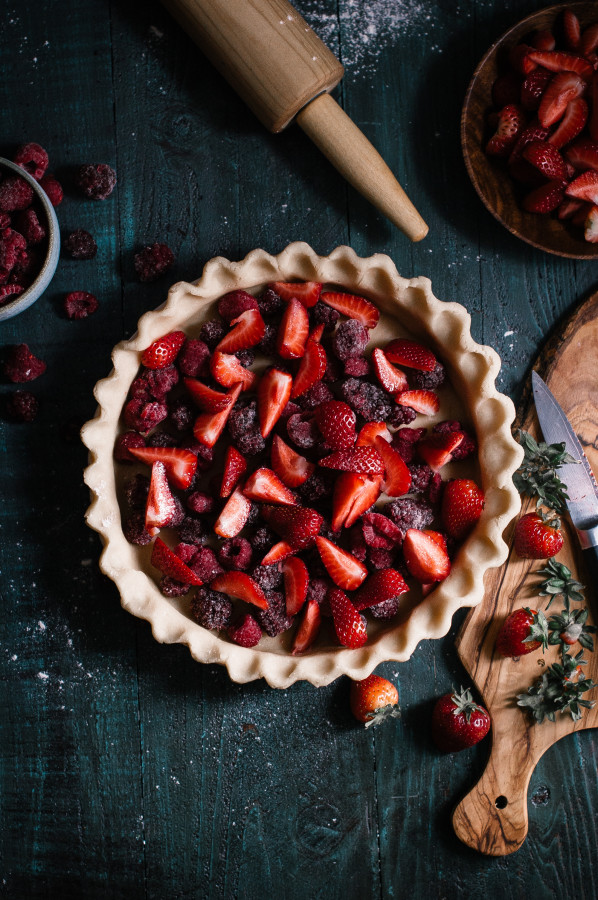
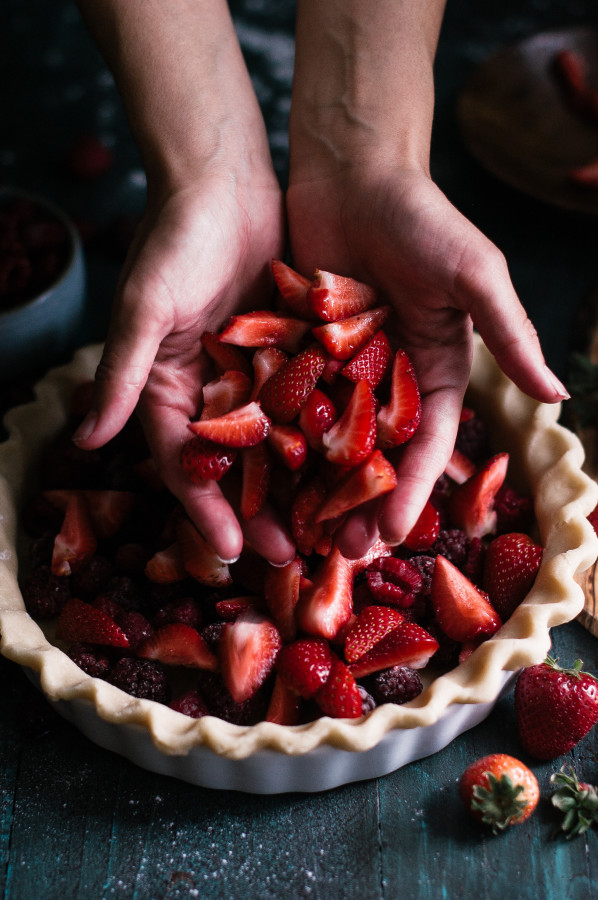
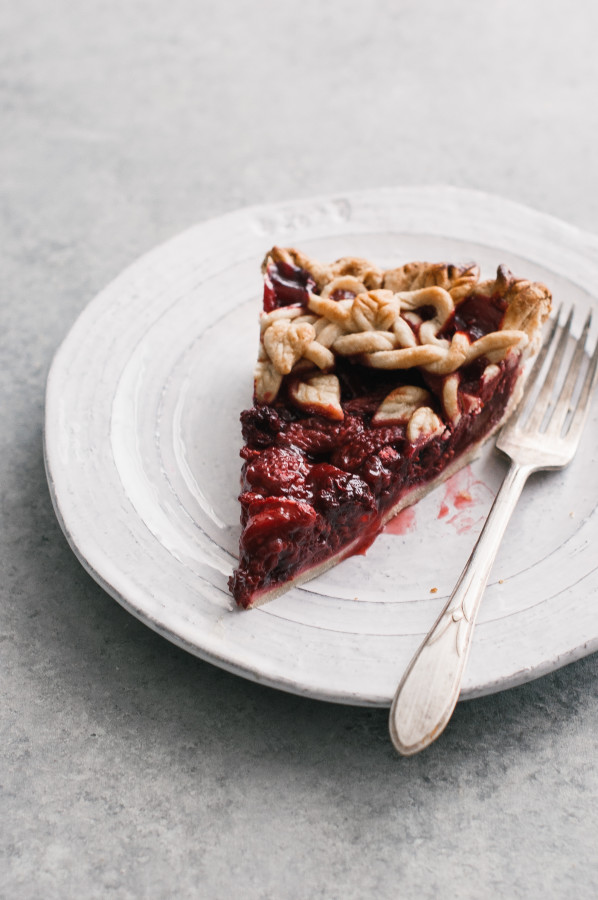
The filling for this pie is one of my favorites. I love strawberries in pie, but not on their own. They need a few other bedfellows, raspberries and blackberries in this case. Berries can stand on their own two feet, in my opinion. They just need a little sweetening and a thickening agent to jam up all the liquid they’ll release when baking.
I used turbinado sugar in this pie and I have to tell you I really prefer it to white sugar. It has a depth of flavor that white sugar doesn’t have, yet it still leaves a clean, sweet taste. Don’t worry about the coarseness of the sugar, it will dissolve quickly while baking.
Tapioca starch was used to thicken up the pie filling. I was really pleasantly surprised at the results. Tapioca starch can act funny at times, and can at a bit of a gummy, mucus-y texture to sauces (sorry, there’s no other way to say it). But it was absolutely perfect in this pie. The baked filling was perfectly jam-like, and not runny at all. I’ve decided that tapioca starch will be my go-to in fruity pie fillings, from here on out.
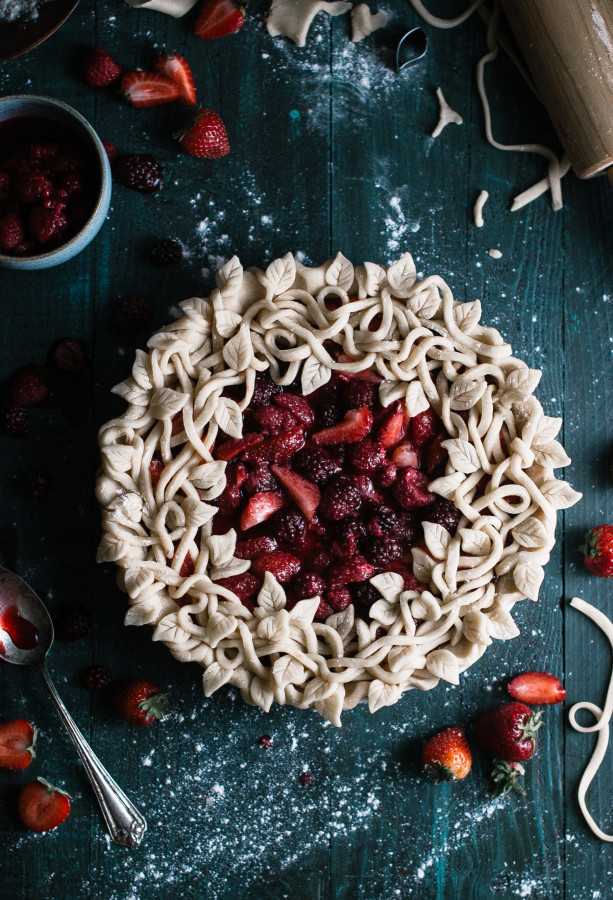
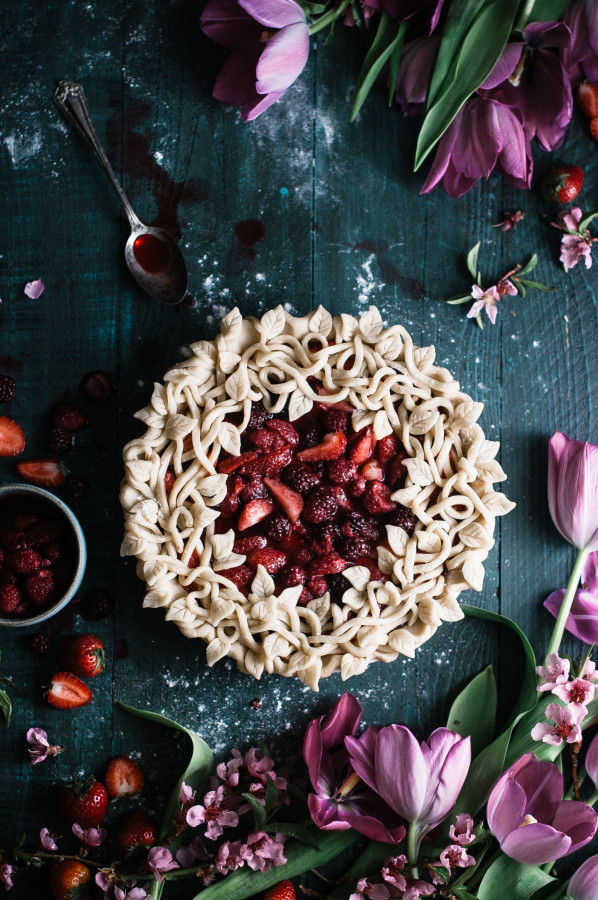
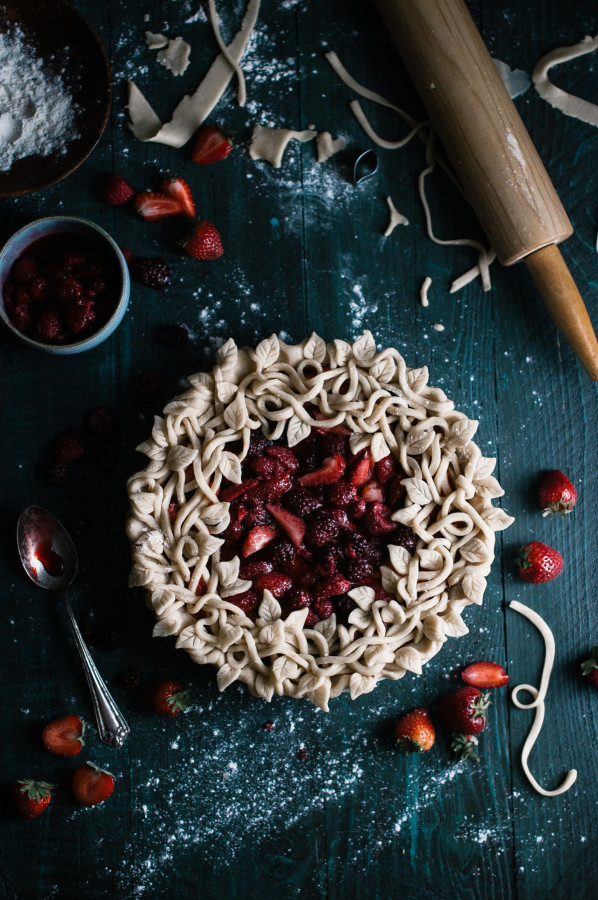
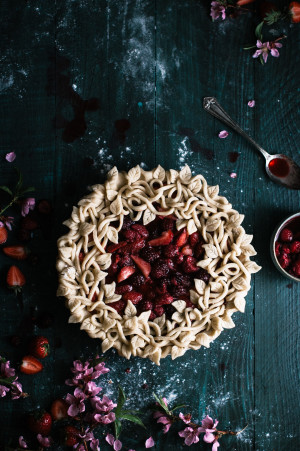
The hardest part of preparing this pie, of course, is the decorative crust on top.
I know you may not believe me, but it’s really not that hard to put together. You need patience more than you need technical pastry making skills.
I thought a vine and leaf patterned crust would be so nice for the springtime. The technique basically consists of looping and winding strips of dough around each other, leaving the center of the pie open for a peek-a-boo filling effect. Little leaf shapes are cut out and I simply pressed a back of a knife into the tops to make the indentations. Place the leaves around the pie randomly, tucked into the vines, and that’s that.
Well, except for a little egg wash, so that the crust will be nice and glossy after it’s baked.
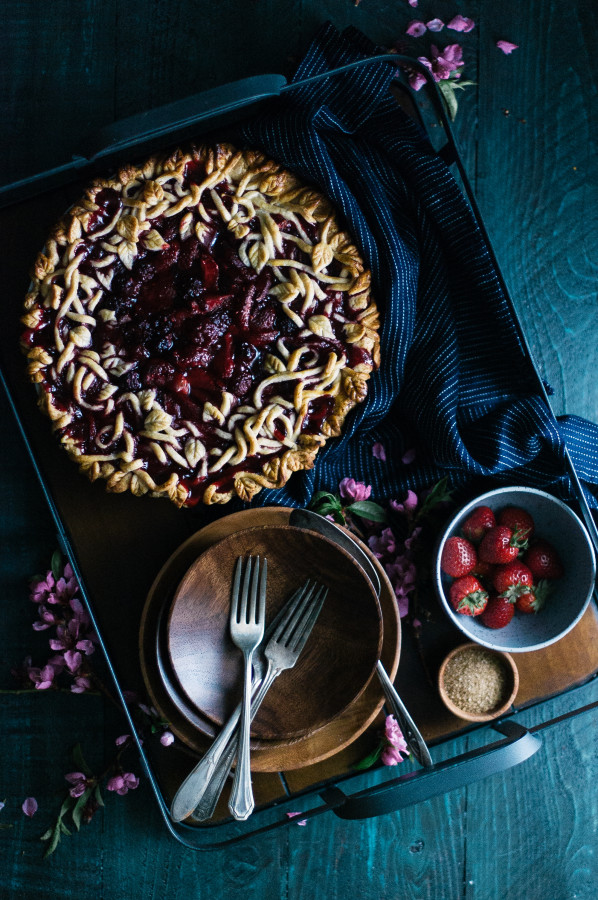
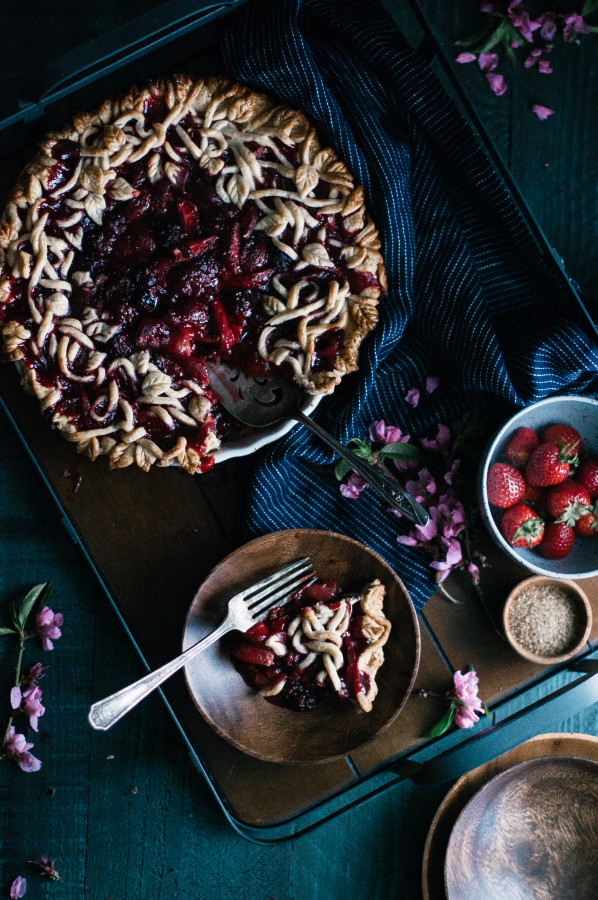
This pie is extra delicious with a scoop of vanilla ice cream on top. Actually, that probably applies to all pies, but berries and ice cream are a match made in heaven!
More Pie:
Blackberry Mascarpone Hand Pies
Fried Pumpkin Pie Cheesecake Hand Pies
- FOR THE CRUST:
- 2½ cups White Whole Wheat Flour
- 3 tablespoons fine Cane Sugar
- ¼ teaspoon Sea Salt
- ½ Vanilla Bean
- ¼ cup Shortening
- 12 tablespoons (1½ sticks) Butter, cold and cut into small cubes
- ¼ cup + Ice Water
- FOR THE FILLING:
- 1½ cups Blackberries (fresh or frozen)
- 1½ cups Raspberries (fresh or frozen)
- 1½ cups Strawberries, quartered (stems removed)
- Juice of ½ a large Lemon
- 1 cup Turbinado or Demerara Sugar
- 6 tablespoons Tapioca Starch
- 1 egg, beaten
- FOR THE CRUST:
- Place the flour, sugar, and salt in the bowl of a food processor fitted with an 's' blade. Scrape the seeds of the vanilla bean into the bowl, close the lid, and pulse the mixture a few times until blended together.
- Add the shortening to the food processor and pulse once. Add the cubes of butter, one at a time, pulsing a few times after the addition of each cube.
- With the processor running, drizzle in the ice water until the mixture starts to form into large clumps. Do not add too much water. Dough should not be sticky or wet, but should come together to form a nice dough.
- Divide the dough in half, wrap up one half and set aside.
- Roll the other half of dough into a ball and place in between two sheets of parchment paper. Roll to a circle that is 1½-2 inches larger in circumference than your pie dish.
- Place the sheet of dough over the top of your pie dish and remove parchment paper. Press the dough in to fit the bottom and sides of the dish. There should be a little bit of dough left hanging over the edges. Trim dough so that it evenly hangs over the edge about ½ inch.
- Use your fingers to press large ruffles around the edge of the crust.
- Set aside and make the pie filling.
- FOR THE FILLING:
- Place the blackberries, raspberries, strawberries, lemon juice, tapioca starch, and sugar in a large bowl. Toss to coat - tapioca starch should dissolve.
- Spoon the mixture evenly into the dough lined pie dish.
- Place the remaining half of the pie dough in between two sheets of parchment paper and roll to a thickness of ⅛".
- Using a sharp knife or roller cutter, cut 20-30 strips of dough that are about 12" long and ⅛" wide.
- Carefully lift one strip at a time and lay them around the edge of the pie crust, intertwining and looping them. Leave the center of the pie uncovered with dough strips. Keep adding strips to the top of the pie until you feel like there are enough vines covering it.
- Using a small leaf shaped cookie cutter, cut out leaves (30+) from the rolled pie dough. Use the back of a knife to make indentations in the leaves.
- Place the leaves in the dough vines, placing some around the edge of the pie, some in the center of the vines, and some around the inner edge of the dough vines.
- Brush beaten egg over the top of the pie crust.
- Cover the top of the pie with tin foil very carefully and bake on the middle rack of an oven at 375 degrees for 45-50 minutes.
- Remove the tin foil and continue baking the pie until the filling is bubbling. The center of the filling should be thick and gel-like.
- Remove from the oven and let cool.
- Serve warm or at room temperature.

Omg, YES! This pie crust is something I’ve never seen and it’s stunning! Thanks for yet more inspiration!
Thanks so much, Tori! =)
This pie is so gorgeous! I can’t stop looking at it. So beautiful.
Thank you Lori!
The pie crust decorations I’ve seen on your website are stunning; you are so talented. Keep them coming and thanks for sharing…
Thank you so much for the kind comment, Raschell! =)
what a lovely strawberry tart ….. I love this technique! I prepared earlier Thursday to’ll post the recipe and the Line to your blog when I would write the recipe. Thank you for sharing
Thank you Magali! I’d love to see your pie!
Nham-mie..the pie looks so beautiful and sure delicious. Thanks for your’re sharing
I don’t do whole wheat.. is all purpose ok> I don’t want to mess up your recipe.Thank you
Yes! All purpose will work just fine! 🙂
Hi! Can I do this with all strawberries? I went strawberry picking and this is the berry I have at my disposal.
Definitely! Any berry will work!
Gorgeous pie! I’m with you, I love pie crust. I love pizza crust too but pie crust is best.