I find that when my life is feeling stressful, or over-complicated, baking something whimsical is very therapeutic. I’m not sure how that really makes sense in any way…three kids under the age of 6 demanding, well, very reasonable things(you know, like food, baths, the usual), taking on about as many projects as I can(hopefully) handle, and house hunting and I’m about maxed out. So it makes perfect sense that you would find me in the kitchen baking a cake filled with three different types of mousse over the course of two days.
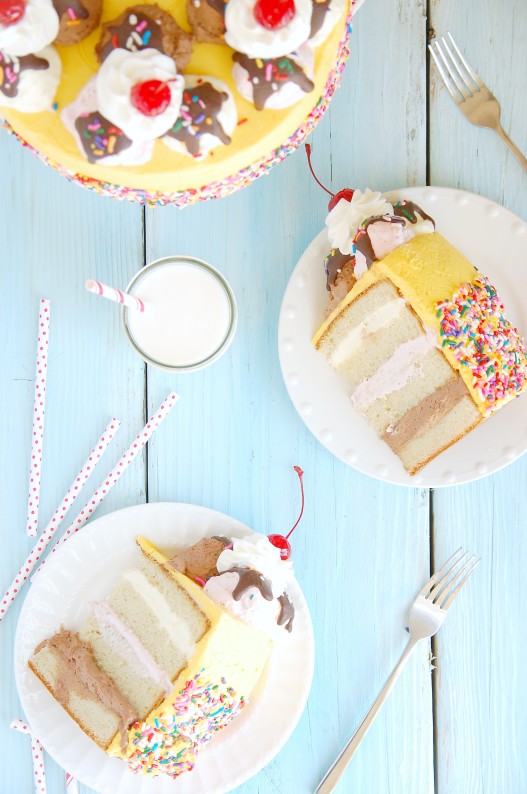
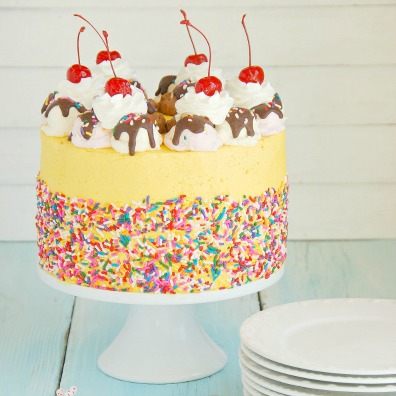
But this cake is not just any cake. It is the ultimate Ice Cream Parlor Cake(with no ice cream in it whatsoever).
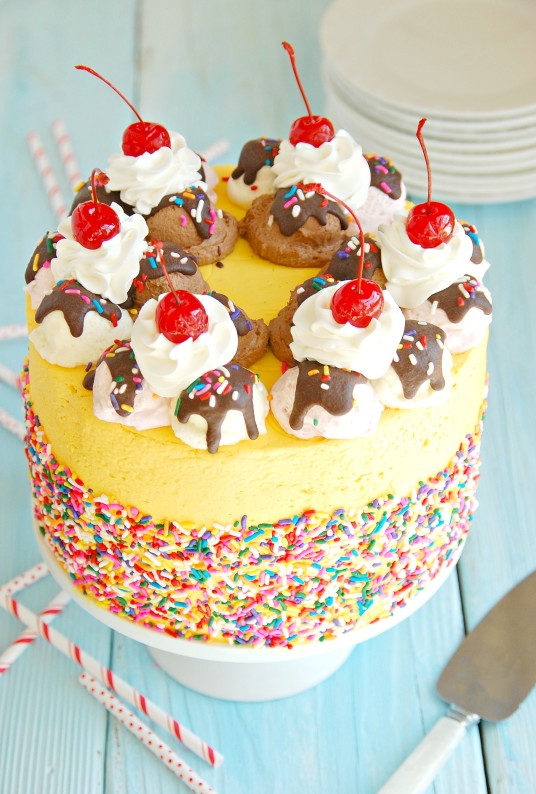
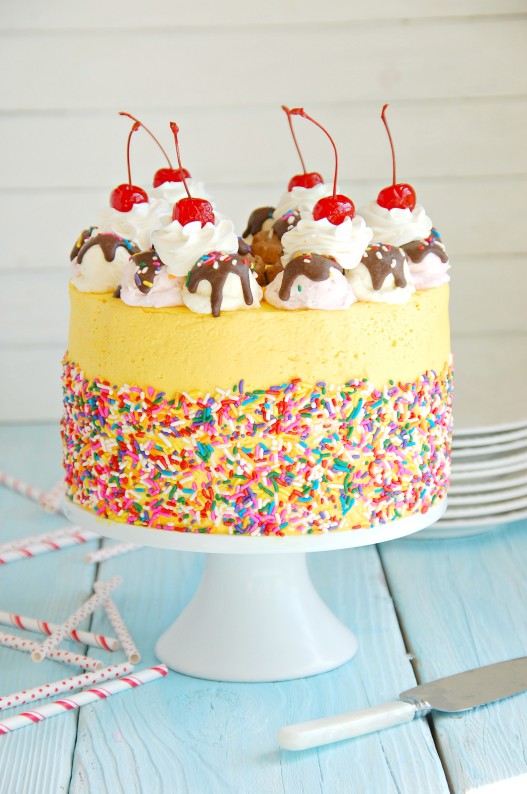
THE BANANA SPLIT MOUSSE CAKE
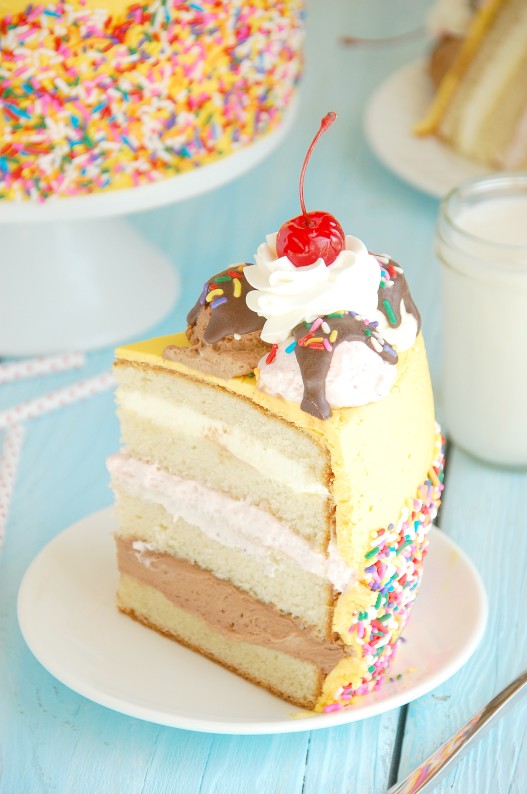
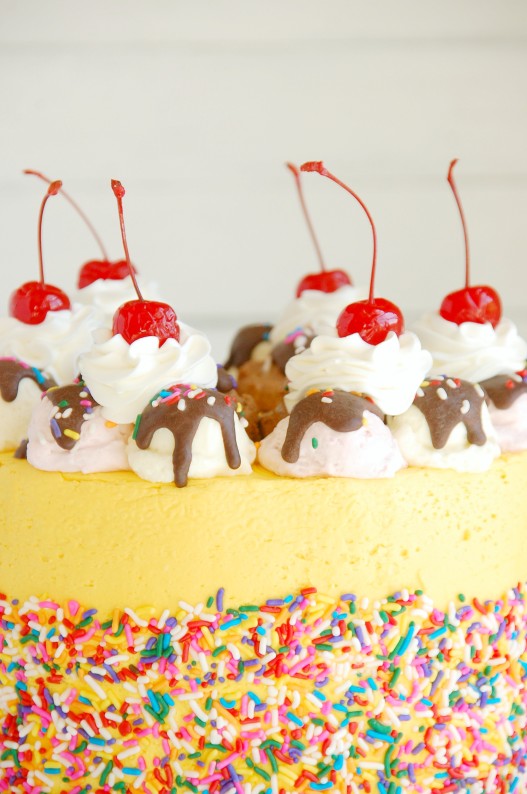
It deserves every one of those capital letters. This culmination of my entire being starts with layers of banana cake, each one filled with a different type of mousse. Chocolate custard mousse, strawberry mousse, and vanilla custard mousse. Then it’s all wrapped up in sweet vanilla buttercream and sprinkles and topped with scoops of ‘ice cream'(really more mousse), drizzles of chocolate ganache, more sprinkles, whipped cream and the expected and always necessary cherry on top.
The mousse can be made ahead of time, as well as the cake and buttercream frosting. So you can whip, bake, and fold one day, and assemble it the next. The chocolate and vanilla mousses both come from one custard base, as to not over-complicate the already complicated(not sure that it really helps as this point). I like to freeze the cake for an hour or two before I frost it(once it has been filled with mousse). It helps keep the mousse inside a little bit better. Placing a wooden skewer in the center before frosting will also help keep the cake from shifting while frosting it. Just make sure you check the shelves in your freezer for stability(like I did not) so that an upper shelve does not fall on your freshly filled mousse cake. This baby had to be stuffed with cherries on the opposite end pictured to help it regain it’s composure.
- FOR THE BANANA CAKE:
- 2¾ C. Flour
- 1 tablespoon Baking Powder
- ½ teaspoon Salt
- 12 tablespoons Butter, room temperature
- 2½ C. Sugar
- 6 Eggs
- 1 C. + 2 tablespoons Buttermilk
- 1⅓ C. Pureed Ripe Banana
- FOR THE MOUSSE:
- 1 half recipe Fresh Strawberry Mousse
- ¼ C. + 1 tablespoon Sugar
- 2 C. Whole Milk
- ¼ C. + 1 tablespoon Sugar
- 3½ tablespoons Cornstarch
- 2 Eggs
- 1 Egg Yolk
- 2 tablespoons Butter
- 1 teaspoon Vanilla
- ¾ C. Semi-sweet Chocolate Chips
- 2 C. Heavy Cream
- ⅓ C. Sugar
- FOR THE BUTTERCREAM:
- 2 sticks Butter(8 oz), softened
- 4 C. Powdered Sugar
- 1 teaspoon Vanilla
- Yellow Food Color
- 3-4 tablespoons Heavy Cream
- FOR THE GANACHE:
- ½ C. Semi-sweet Chocolate Chips
- ¼ C. Heavy Cream
- 1 tablespoon Coconut Oil
- TOPPINGS:
- ½ - ¾ C. Sprinkles
- 1 C. Sweetened Whipped Cream(whipped to stiff peaks)
- 6 Maraschino Cherries
- FOR THE BANANA CAKE:
- Preheat the oven to 350 degrees.
- Grease and flour two 8" round cake pans.
- Whisk together the flour, baking powder and salt in a mixing bowl. Set aside.
- In the bowl of a stand mixer, cream together the butter and sugar until light and fluffy.
- Beat in the eggs, one at a time, until well combined, scraping the sides of the bowl as necessary.
- Mix in the banana puree.
- Mix in half of the flour mixture. Mix in half of the buttermilk. Mix in the rest of the flour, and then add in the remaining buttermilk, mixing until just combined.
- Divide batter evenly between the two prepared cake pans.
- Bake for 50-60 minutes, or until a tester inserted in the middle comes out clean. Remove cakes from the pans after 10 minutes.
- Let cool on a wire rack.
- FOR THE CHOCOLATE AND VANILLA MOUSSE:
- Place the ¼ C. + 1 tablespoon sugar and whole milk in a saucepan. Bring just to a boil and remove from heat.
- In a mixing bowl, whisk together another ¼ C. + 1 tablespoon sugar with the cornstarch. Add the eggs and egg yolk , whisking until creamy and well combined.
- Pour the hot milk into the egg mixture in a steady stream, whisking constantly to temper the mixture. Pour the mixture back into the saucepan and whisk constantly on medium heat until it begins to thicken and bubble.
- Remove from heat and whisk in the butter and vanilla.
- Place half of the custard in a small bowl. Press a sheet of waxed paper or plastic wrap into the top of the custard and refrigerate.
- Add the chocolate chips to the remaining custard and whisk in until melted and combined.
- Place the chocolate custard in a small bowl, pressing a sheet of waxed paper into the top of the custard and refrigerate.
- When both custards are chilled, make the whipped cream by placing the cream and sugar in the bowl of a stand mixer fitted with a whisk attachment and whipping until if forms very stiff peaks.
- remove the custards from the fridge and whisk each custard to smooth it out.
- Divide the whipped cream between the two custards and gently fold each together until smooth and thick. Cover each mousse and refrigerate again.
- FOR THE BUTTERCREAM:
- Place the butter in a stand mixer and beat until creamy. Slowly add in the powdered sugar. Mixture will be thick. Add the vanilla and yellow food coloring(use as much color as desired). Slowly beat in the heavy cream, 1 tablespoon at a time, starting with 3 tablespoons. Scrape down the sides of the bowl. Beat the frosting on medium/high speed until light and fluffy, about 2 minutes. Add more cream to thin frosting, if needed.
- FOR THE GANACHE.
- Place the chocolate chips, heavy cream, and coconut oil in a small bowl. Microwave on high for 30 seconds. Stir. Microwave for another 30 second, or just until all of the chocolate is melted. Whisk together until smooth. Set aside.
- TO ASSEMBLE THE CAKE:
- Level both cooled banana cakes and slice each cake in half, making 4 even layers.
- Place bottom layer of cake on a cake stand or plate.
- Top the layer with all but ½ C. of the chocolate mousse. Keep reserved ½ C. of mousse in the fridge. Smooth out the mousse evenly over the cake and top with another layer of cake.
- Place all but ½ C. of the strawberry mousse on top of that layer, reserving ½ c. of the mousse in the fridge. Top with the third layer of cake.
- Top the third layer of cake with all but ½ C. of the vanilla custard mousse, reserving ½ C. in the fridge. Smooth out the mousse and top with the final layer of cake. Insert a wooden dowel or skewer in the center of the cake to help it stay together.
- Scrape the sides of the cake, pressing in any protruding mousse.
- Freeze cake for about 2 hours.
- Frost the cake with the vanilla buttercream.
- Using a 1 Tablespoon scoop, place scoops of the reserved mousses around evenly around the edge of the cake(see pictures.
- Drizzle a small amount of ganache atop each scoop of mousse.
- Top the gananche with sprinkles.
- Pipe a dollop of whipped cream in the center of each group of mousse scoops(for a total of 6)
- Place a cherry on top of each whipped cream dollop.
- Keep refrigerated.

What an incredibly fun and perfect cake for the kids! I will have #3 here soon, but 3 under 6? You’ve got your hands full but somehow you absolutely nailed it with this cake.
Thank you so much Matt! My hands are definitely full! But I employ my kids as food critics, so it works out 😉 Congrats on #3! That is so exciting!
Beautiful, beautiful, beautiful! I can’t wait to try this. I’d hate to cut into it though 🙂
Thank you so much Lorinda! Cutting cakes is always painful…unless you get three kinds of mousse inside! =)
Kayley, this is spectacular!! Definitely whimsical, and just looking at it makes me feel less stressed!! I am so in love with this cake. Thank you so much for making it so that I can sit here and stare at it on my computer screen 🙂
You’re so sweet, Serene, thank you! It definitely is a mood booster, haha =)
This is so beautiful and yummy looking! But seriously I would l have lost my cool with that fridge malfunction you had! Yikes! Despite that, it looks flawless
Thank you Holly! I totally lost my cool and cried a little bit. The good thing is the cake takes so much work that there was no way I was going to let that freezer defeat me! 😉
This is stunning Kayley! I totally agree with you – baking (and photography for me) is very therapeutic. I am amazed by your cake making and decorating skills!
Thank you so much, Chelsea! You’re right, photography is so therapeutic as well. =)
Oh my goodness this looks absolutely amazing! I am definitely pinning this for later! Amazing!