I’m back with the 2nd edible gift in my little series this month!
I have always wanted to try this “hot chocolate on a stick” thing and this is the year!
I made these last night for a Christmas party and they were a hit! We had a little hot chocolate bar where we set out a crockpot full of hot steamed milk, empty mugs, and these peppermint marshmallow hot chocolate stir sticks(salted caramel chocolate sticks as well, but that’s a post for another day ;)).
No, these aren’t a super simple quick treat(are they ever over here? Haha), but they make a mean cup of cocoa. And they look nice too!
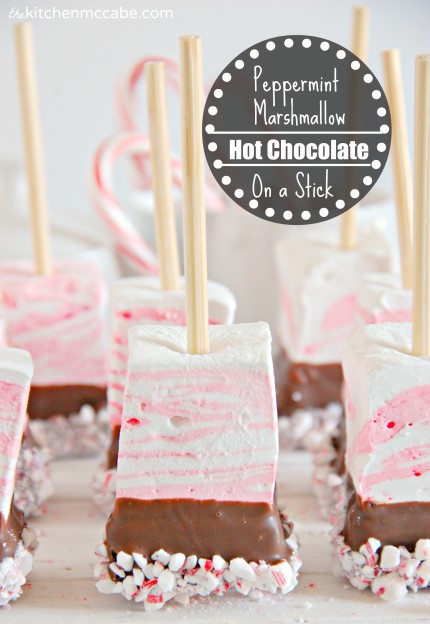
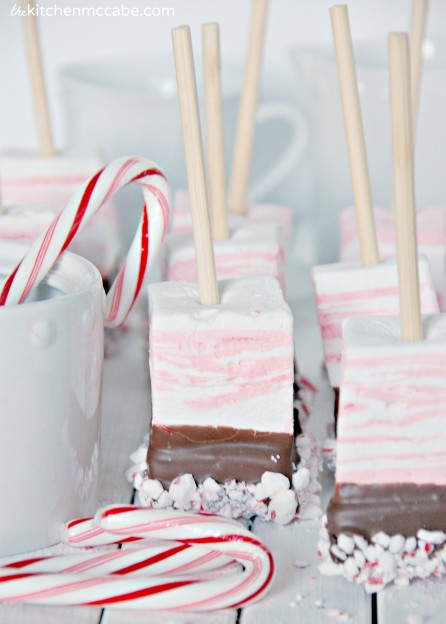
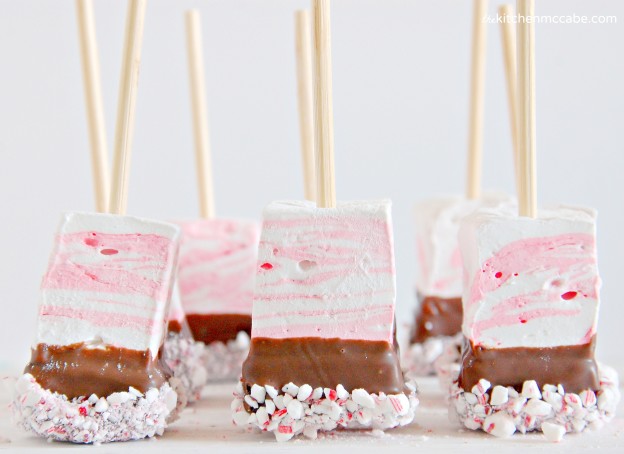
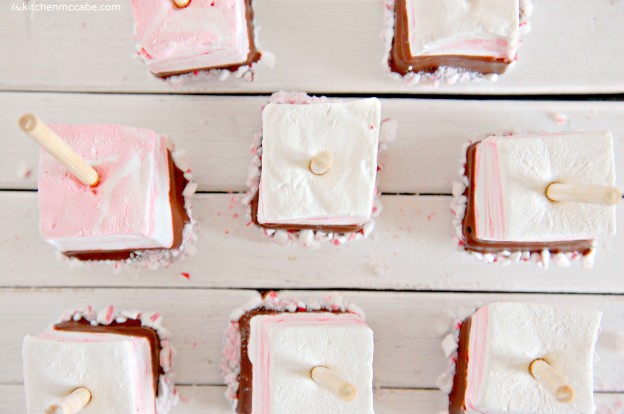
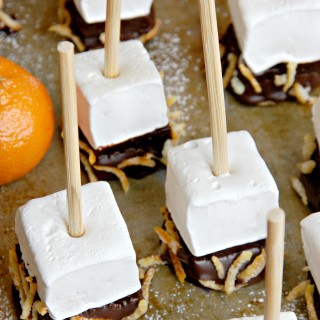
Homemade peppermint marshmallows on top, chocolate ganache on the bottom, all dipped in chocolate and rolled in crushed candy canes. These sticks are perfect for a holiday party, particularly in the frozen winter wonderland that is my home.
Have you ever tried making homemade marshmallows? They really are pretty easy to make(albeit quite messy). And once you try them, you’ll never want to buy them again. Homemade marshmallows are so customizable! I added peppermint oil and red coloring to make these peppermint marshmallows, but you could make so many other types. I want to try some orange infused mallows next time I make them. This recipe is one I found on Epicurious years ago and have modified slightly for this treat. It turns out great every time!
The hot chocolate making procedure is simple:
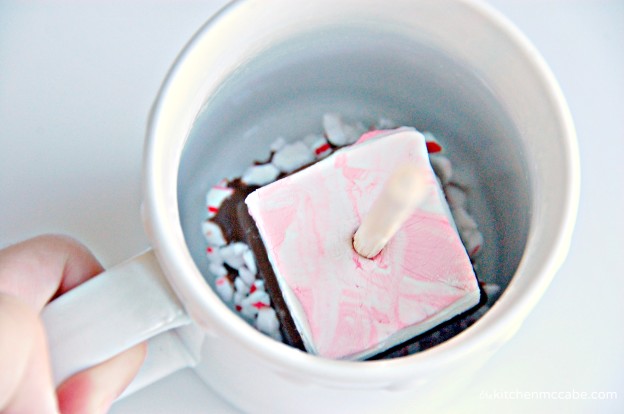
Place a hot chocolate stick in a mug.
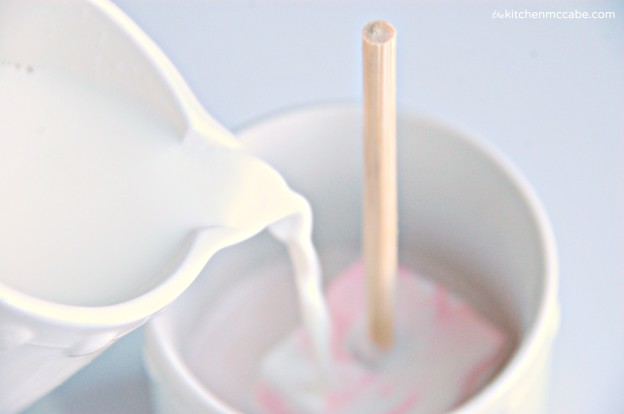
Fill the mug full of steaming hot milk(I use whole for creamier hot chocolate). Don’t fill it too full! The marshmallow will melt and foam, causing your milk to overflow if there is too much.
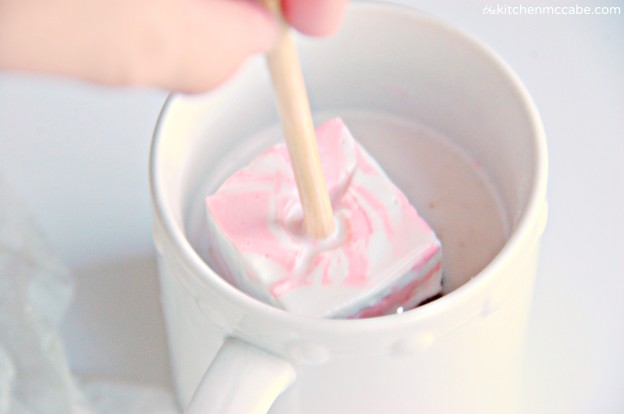
Let that cube of holiday cheer sit in the hot milk for a minute or two. Then stir it up well.

Enjoy your cup of peppermint hot chocolate complete with foamy marshmallow topping!
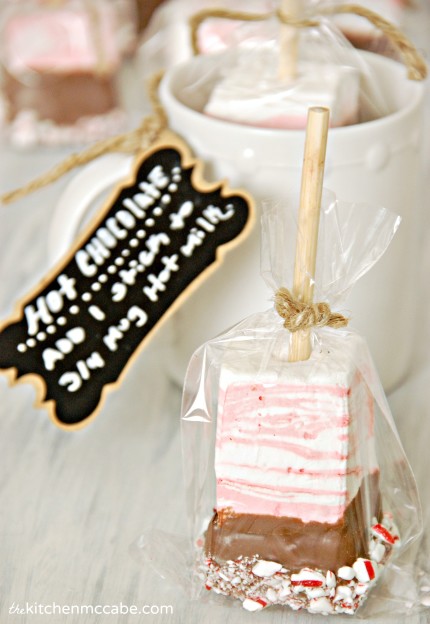
Also, these make the perfect little Christmas gift! Wrap the marshmallow sticks up in little treat bags, tie with twine and gift them to your neighbors and loved ones along with mugs and a little chalk board tag instructing them on how to make their own cup of hot chocolate!
I am guest posting today over at the fabulous Just-Between-Friends.com, so head on over HERE to get the ganache recipe for these fun Holiday treats!
HOW TO MAKE PEPPERMINT MARSHMALLOW HOT CHOCOLATE ON A STICK:
You’ll need:
1 recipe chocolate ganache
1 recipe Peppermint Marshmallows, cut into squares
1 12 oz bag Wilton Chocolate Melts, melted
12 red and white Candy Canes, crushed(I use a food processor)
20-30 wooden sticks
Ready a surface to place your chocolate dipped marshmallow sticks on(I use a silpat mat). Turn the chilled ganache out onto a large piece of parchment paper. Cut any sloping sides off of the ganache(using a hot, wet knife) so that all edges of the ganache are straight. Insert a wooden stick into a marshmallow so that the top of the stick goes all the way through the mallow and sticks out at least 1/2″ through the other end. Place the marshmallow on top of the chocolate ganache so that the corners of the marshmallow and ganache line up and the 1/2″ of exposed wooden stick is pressed down into the ganache. Repeat this with the other marshmallows, lining up the marshmallows on the ganache so that sides of each marshmallow are almost touching.
Using a hot, wet knife, cut down through the lined up marshmallow sticks so that you are cutting squares of ganache that match up with the marshmallow square on top. Remove each marshmallow/ganache square as you cut it to another sheet of parchment. Wipe off or rinse the knife after each cut.
When you have finished cutting the ganache into squares, you can dip them in chocolate. Dip each square in melted chocolate so that the chocolate totally covers the ganache and comes up to the sides of the marshmallow. Carefully tap off the excess chocolate and place the marshmallow stick on a plate of crushed candy canes. Push the crushed candy canes up around the chocolate. Remove the stick and place on your non-stick mat(or parchment) and allow to set up. Repeat this with the remaining marshmallow/ganache sticks.
- Nonstick Cooking Spray
- 1 C. Cold Water, divided
- 3 -1/4 oz. packets Unflavored Gelatin(3/4 oz. total or 3 packages at .25 oz each)
- 2 C. Sugar
- ⅔ C. Light Corn Syrup
- ¼ t. Salt
- 2 t. Vanilla Extract
- 4-5 drops Peppermint Oil(I love doTERRA's)
- ½ t. Red Gel Food Coloring
- ½ C. Powdered Sugar
- ½ C. Cornstarch
- Line 13x9x2-inch or 8x8 inch metal baking pan with foil.
- Coat foil lightly with nonstick spray.
- Pour ½ cup cold water into bowl of heavy-duty mixer fitted with whisk attachment. Sprinkle gelatin over water. Let stand until gelatin softens and absorbs water, at least 15 minutes.
- Combine 2 cups sugar, corn syrup, salt, and remaining ½ cup cold water in heavy medium saucepan.
- Stir over medium/low heat until sugar dissolves, brushing down sides of pan with wet pastry brush.
- Attach candy thermometer to side of pan. Increase heat and bring syrup to boil. Boil, without stirring, until syrup reaches 240°F, about 8 minutes.
- With mixer running at low speed, slowly pour hot syrup into gelatin mixture in thin stream down side of bowl (avoid pouring syrup onto whisk, as it may splash). Gradually increase speed to high and beat until mixture is very thick and stiff, about 15 minutes.
- Add vanilla and peppermint oil(5 drops will give you a strong mint flavor) and beat to blend, about 30 seconds longer.
- Scrape ½ the marshmallow mixture into prepared pan.
- Add the red coloring to the remaining marshmallow and whisk again, just until the color is mostly blended in(red streaks are ok).
- Pour the red marshmallow on top of the white marshmallow and swirl the colors together with a spoon or knife(work quickly, the marshmallow sets up fast!)
- Smooth top with wet spatula(I use my fingers, dipped in a little water). Let stand uncovered at room temperature until firm, about 4 hours.
- Stir cornstarch and powdered sugar in small bowl to blend. Sift generous dusting of starch-sugar mixture onto work surface, forming rectangle slightly larger than 13x9 inches.
- Turn marshmallow slab out onto starch-sugar mixture; peel off foil. Sift more starch-sugar mixture over marshmallow slab. Coat large sharp knife (or cookie cutters) with nonstick spray.
- Cut marshmallows into squares. I cut them into squares that are about 1½"x1½".
- Toss each in remaining starch-sugar mixture to coat. Transfer marshmallows to rack, shaking off excess mixture.
- Store the marshmallows in an air-tight container.
this is such a great idea and they are so cute!
Thank you Dina! They were really fun to put together!
I’m so excited to do these! Quick question…did you use an 8×8 pan for the ganache, or a 9×13 to match up with the marshmallows?
I use an 8×8 pan for the ganache because I like the chocolate section to be thicker, but if you still wanted it to be thick and use a 9×13 pan to match up with the marshmallows, you could always double the ganache recipe. Let me know how they turn out!
How long can these be stored before they go bad?
And do they need to be kept refrigerated?
Krista, you can store these for at least a week( I would recommend refrigerating them because of the ganache base), any longer than that and the marshmallow will become stale. If you are giving them as gifts you could make the ganache and refrigerate it and keep the marshmallows covered at room temp and then assemble them before gifting. 🙂
So how are you getting your marshmallows to be that tall? I put mine in a 9 x 13 pan and they were very flat. Also is the ganache supposed to be pretty firm? Mine wasn’t very firm, and just made a big mess when I tried to move it with the marshmallow. Such a cute idea, I would love to get it to work.
To get super tall marshmallows, put one recipe in a 8×8 pan instead of a 9×13. You won’t get as many marshmallows out of it, but they will be very tall! I like the 9×13 for very square marshmallows. As for the ganache, that’s strange that yours didn’t set up very firmly. It could have to do with the kind of chocolate you used. The darker the chocolate you use, the firmer the ganache will be. You could try cutting back the cream to 1 C. per 16 oz, or even 3/4 C. to make sure you get a very firm ganache. Also, make sure you give the ganache a lot of time to firm up in the fridge.
I made these today and while they did not turn out pretty like the picture, they ARE delicious
Glad you liked them, Heather!
I made these and gave them to my staff at work! I had scraps of ganache left over from trimming and plenty of marshmallow, so I made myself a cup. AMAZING!!! I’m making more ganache for my left over marshmallows to give to my friends for Christmas! Thanks for this recipe!
The only problem I ran into was that, although I waited until the last minute to pull the ganache out of the fridge, it melted slightly in the coating! It ruined my first batch of chocolate melt so I put the whole set back in the fridge and melted the chocolate in smaller amounts and did the sticks only a few at the time while keeping the rest in the fridge. And mine where hideous, but delicious. 🙂