
I used to love getting a tin of shortbread cookies from…well, someone each Christmas when I was growing up. There were always the traditional printed shortbread cookies and the sugar crystal-crusted ones. But is seems like there were also crisp, swirly, butter cookies that looked oh-so elegant with their golden ridges.
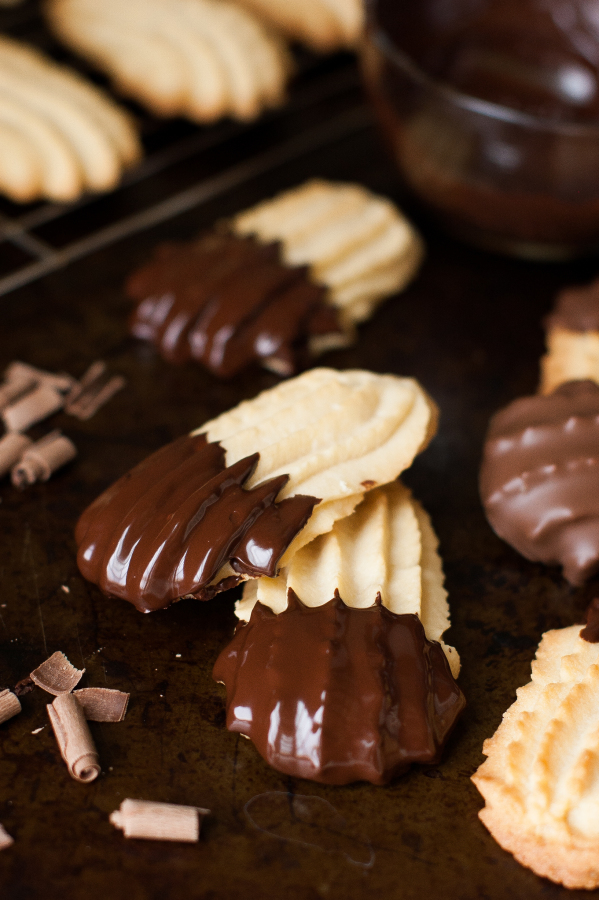
These Chocolate Dipped Italian Butter Cookies remind me of those cookies.
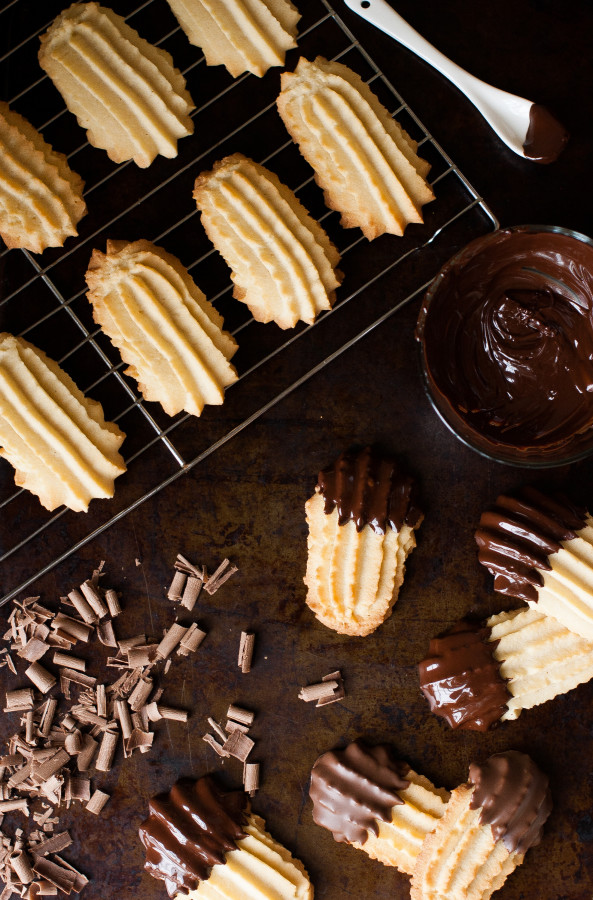
These cookies are like a very sturdy shortbread, with an extra crisp texture that goes so nicely with a dipping of chocolate. I used both regular and powdered sugar to give it a texture that is crispy, but not overly crunchy.
These are given their pretty look by piping the dough out with a piping bag and tip like these:
Ateco 3224 24″ Canvas Decorating Pastry Bag
You will need a little muscle to pipe these out, but it’s not too hard.
Pipe little fingers like these, or get fancy and make circles or swirls. Anything you want. Just don’t make them too large and keep them uniform in size so that they cook evenly.

Wouldn’t these make such a pretty gift? These are definitely making it onto my Christmas cookie gift plates.
Make them really special by using a high quality dark chocolate. Regular, easy-melt chocolate bark or wafers will work great too. And if you wanted to, you could get crazy and dip the chocolate coated cookies in sprinkles or chopped dried fruit. Or nuts. Whatevah. You’re the boss.
- 1 C. Salted Butter, softened
- ½ C. Sugar
- ⅓ C. Powdered Sugar
- 2 Eggs + 1 Egg Yolk
- 1½ t. Vanilla
- 2½ C. Flour
- ¼ t. Salt
- ½ t. Baking Powder
- 1½-2 C. Dark Chocolate, melted
- Chocolate Curls
- Preheat oven to 350 degrees. Line two baking sheets with parchment or non-stick mats.
- Add butter and sugars to the bowl of a stand mixer fitted with a paddle attachment and beat until smooth, creamy and fluffy, about 3 minutes.
- Add the egg and vanilla and beat until combined.
- In a mixing bowl, whisk the flour, salt, and baking powder together and add to the butter mixture. Mix together until just combined.
- Scoop dough into a large piping bag fitted with a large star tip.
- Pipe strips of dough out onto prepared sheets. To make them as pictured, tilt the tip down while piping it out and slowly bring it to a 45 degree angle as you pipe,so that the tip of the cookie is slightly curled under.
- Bake cookies for 10-12 minutes or until the edges just look golden.
- Cool on a wire rack.
- When the cookies are cool, dip the tips in melted chocolate, and place on parchment paper to set. Sprinkle chocolate curls over the chocolate dipped cookies, if desired, but make sure to wait until the chocolate is no longer warm, but has not hardened.


These look incredible, LOVE the pictures!
Thanks so much, Matt!
Gonna be making 20 dozens of cookies in a few days, and these are SO on my list!! I’m so excited to land on your recipe!
Love your blog too, by the way 😉
-Kayiu
Oh god, after seeing this post these chocolate dipped butter cookies are all I am craving. I can only imagine how delicious they tasted!
Thanks, Thalia! They are one of my favorites this season!
oh my goodness, growing up, we ALWAYS had a few tins of those shortbread cookies in our house during the holidays. . love love love that you dipped these in chocolate! so elegant!! love the texture and detail on these cookies. . so perfect!!! Happy holidays!!
Hi, im from england and we use the metric system so im a little confusedwhen you said i need a cup of butter? What exactly dies that mean? Like a cup of chunjs of butter or a cup of melted butter? I really want to make these!
Hi Sadiya, 1 C. of Butter would be 8 oz. or 16 tablespoons of butter.
Hi, there! May I ask why you code to use 1 whole egg and two egg yolks? I have searched quite a bit about Italian buttered cookies and most of them either use whole eggs or egg whites. I want to make the cookies of your recipe, because they look really good! I just have this question and hope you would answer. Thank you! ?
Chose*
Can this dough be frozen? If so, for how long?
Yes, it should keep for a few months =)
These look great! Will the dough work in a cookie press? Thanks!
I just made these babies in star and heart shapes! A perfect little gift for people. It’s easy to make, but quite time consuming (or at least I found them to be) — but it’s a wonderful and relaxing process. It yielded a lot of cookies as mine were rather small. I’m very glad I found this recipe. I was browsing and browsing through the web and finally came across one with encouraging comments, so I gave it a go. I’ve never been much of a cookie person in that I never tend to get them right (they always make me nervous). I made these and they turned out absolutely delicious. The dough was spot on; easy to work with. I didn’t use the piping bags as I wanted to make them specific shapes, but the pictures look amazing and in the future I shall give them a go for sure.
For anyone cutting the dough out into specific shapes, I would definitely suggest refrigerating the dough for about 40 minutes or so — I decided to experiment with the dough a bit and found that refrigerating it allowed for an firmer and thus easier cut to then place on the baking tray.
Thanks again for the recipe, Kayley. I’m no longer afraid of baking cookies! Never when they’re this yummy!
I just made these, and while they came out nicely, it wasn’t very easy. My dough was way too stiff to pipe through a regular bag and tip. I ended up adding a little bit of milk to soften the dough and then pushing it through the star tip with my finger. Not ideal when the goal is to make 50 cookies. Any thoughts from people who’ve made this recipe?
I pipe them without a tip..
Can these cookies be made without eggs?
No, the eggs are what bind the cookies together and give them their texture =)
butter mixture and the set aside flour can be mixed with electric mixer ? or by hand?
I just made these and they were so delicious. I dipped them in mint dark chocolate and dark chocolate after. I added about a tablespoon or less of milk to the dough, and it worked out fine to pipe. I used a large star tip. These remind me of some butter cookies I used to love as a child. So glad I can make them now. I am going to write about them on my blog and link to your page, hope it’s okay. Thanks for posting this recipe!
Does the “t” stand for teaspoon or tablespoon?
teaspoon =)
In any recipe… Small “t” always mean teaspoon.
Large “T” always means Tablespoon.
thank you for this delicious recipe! . Great pictures!
How do your cookies retain their shape during baking? Mine spread even though I chilled the piped cookies for 45 minutes before baking.
Hello: your recipe that I printed out August 2015 states 1 egg + 2 egg yokes which is different that this one. Does it make a difference and if so which one is better?
Thank you
Readers were having difficulty piping out the dough, so the extra egg loosens up the dough making it easier to pipe while still keeping the cookies texture similar.
There is a bakery back home in the Chicago area that my sis always stops at and picks up a couple of dozen of these butter cookies when I am coming in town. I have been searching for a recipe that comes close for years … and here it is!!!! Seriously, if you put these gems in a box and tied bakers twine around them, I would not know the difference! Kayley, thank you so much for this amazing recipe. I am truly grateful!!!!
Aw, I love to hear that! Thank you for sharing that with me and I’m so glad you like the cookies!
Yea! I’m going to try this receipe because when I use to live in Chicago Gonellas cookies where the best and haven’t found them online so these look the same.
I printed this recipe a couple of years ago and have made these cookies many times. I made them again last weekend, and my mother in law wanted a copy of the recipe but the print on my copy was too small for her so I came back to your site to print a fresh copy so I could enlarge the print. I noticed that my copy that I printed a couple of years ago calls for 1 egg + 1 egg yolk, but this recipe calls for 2 eggs + 1 egg yolk. Everything else is identical, including the pictures on the page. Why was there a change in the number of eggs. The version I’ve been making with 1 egg has always been a hit, but I’m wondering if the 2 egg version would be even better?
Readers were having difficulty piping out the dough, so the extra egg makes the dough looser and easier to pipe, while still allowing it to hold together well while baking =)
Hi,
Can you upload the video,please?
Can you use a cookie press with star tip?
You could try. I haven’t done it so I can’t say how it will work out 🙂
Can you sandwich these cookies with apricot or rasberry jam
You bet!
Like to try this recipe. Please can you advise the weight of flour and sugar as unsure how this equates to cup measurements. Many thanks!
These look great. Any idea how to keep the chocolate shiny looking? since some dipped cookies look dull and others look shiny, I assume the shiny is because it is still hot and hasn’t cooled?
You’re right 🙂
The shiny cookies have chocolate that hasn’t hardened yet. You could brush a simple syrup on the chocolate after it had set for a shiny effect, I suppose.
Tempered chocolate stays shiny and crisp when it dries but might flake off the cookie.
what does C. stand for? Cup?
cup =)
My son and I just made these and the dough was very easy to work with! They were a huge hit in our house. We delivered them to all our neighbors and they all agreed they were tasty! This is definitely on our list of Christmas cookies now. Thank you!
So glad you liked them! Thank you for sharing, Amy!!
It says flour , I’m in uk. Is this plain or self raising flour?
All purpose:)
Made these tonight. Husband loved them!! New addition to annual Christmas baking. Thanks for sharing!!
Did you add shortening to the chocolate to thin the chocolate for dipping? If not, how did you get such a thin layer of chocolate on the cookies?
It’s just melted chocolate, I tap the cookies lightly over the bowl after dipping them to allow excess chocolate to fall off.
I don’t have a Stand Mixer – can I use a regular hand held mixer?
Yes 🙂
Are these cookies hard to pipe with the piping bag? I made a different recipe and it was very hard to pipe… Even my son who played football at the time was having a hard time.
Just made them and are absolutely delicious. I bought the pipe bag and the tip. So that next time they will exactly like yours
So happy you liked!