*These Chocolate-dipped Browned Butter Vanilla Bean Madeleines are brought to you in partnership with Nielson-Massey Vanillas. All words and opinions, as always, belong to me.
I’ve always been so intrigued by Madeleines.
Madeleines are a French butter cake that resembles a shell-shaped cookie. Crisp on the outside, rich and dense on the inside, Madeleines are pretty much my perfect dessert. Not common in my neck of the woods, and not having spent near enough time in France, I’d only ever been subjected to preservative filled pre packaged versions and I’m quite positive that those don’t do justice to the real thing.
They’re also a little elusive in their pretty simplicity – though they might look easy, they are a bit technical to make. I’ve tried a few Madeleine recipes in the past and had found them usually too light and fluffy, or lacking that crisp exterior while keeping a moist interior.

Baking has become a common way to relax and elevate happiness. Before you can truly enjoy the mindful benefits of baking however, it’s important to master the basics. That’s why I’m excited to talk about a new campaign I am working on with Nielsen-Massey Vanillas, developers of fine vanillas and flavors, called “Better Your Bake.”
“Better Your Bake” is designed to help you master the basics of baking so that you can achieve those mindful benefits.
Now through September, Nielsen-Massey will unveil a new baking technique, in a six-part series, on BetterYourBake.com. Each technique will include a step-by-step video, pro tips, and delicious, seasonal recipes.
Visit BetterYourBake.com to follow along. There you will also find baking myths, a vanilla quiz and baking Q&A with Food Network’s “Challenge” Champion and world-renowned cake designer, Marina Sousa.
What better way to show you how to make this technical French pastry than with the help of Nielson-Massey Vanillas?! BetterYourBake.com provides all the tips needed to turn out perfect Madeleines and their Madagascar Bourbon Pure Vanilla Bean Paste takes these beauties up a notch in the flavor and quality department. Nielsen-Massey’s Madagascar Bourbon Pure Vanilla Bean Paste is crafted from their Madagascar Bourbon Pure Vanilla Extract and real bean specks from the vanilla bean pod. The flavor is sweet, creamy and mellow and it’s thick consistency allows you to add more vanilla flavor without thinning out your batters. It also adds those beautiful vanilla bean specks!
Nielsen-Massey Massey Vanillas is a third-generation family company, crafting premium vanilla products and flavors since 1907. Each vanilla bean is hand-picked, hand-cured, and carefully inspected to make sure it meets their strict quality standards.
Quality vanilla is important to me in my baking – I also love that their products are all-natural, allergen-free, Non-GMO Project Verified and certified Kosher and Gluten-Free.
To turn out the perfect Madeline, Better Your Bake is going to help us with three important steps:
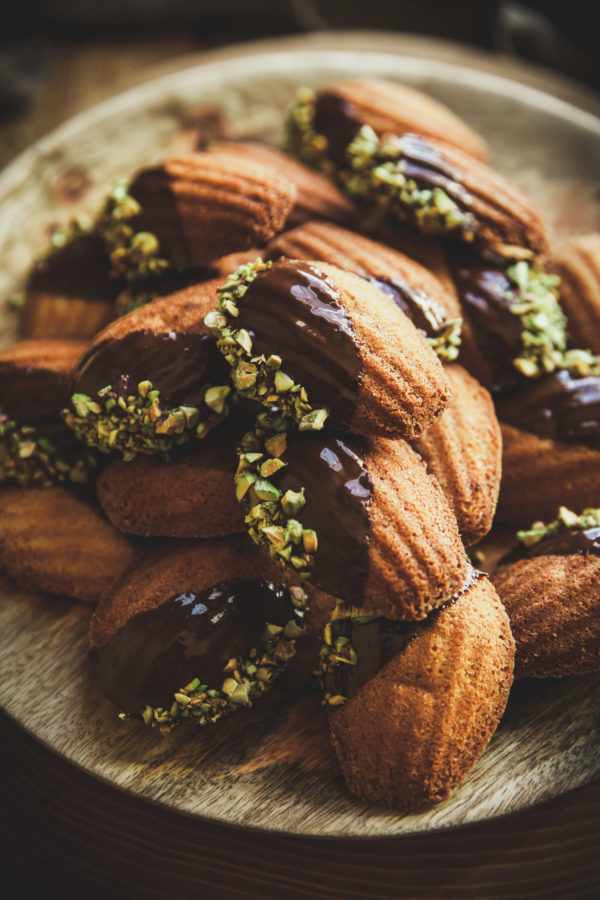
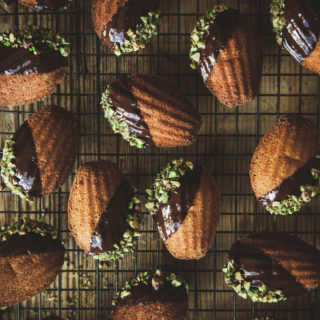
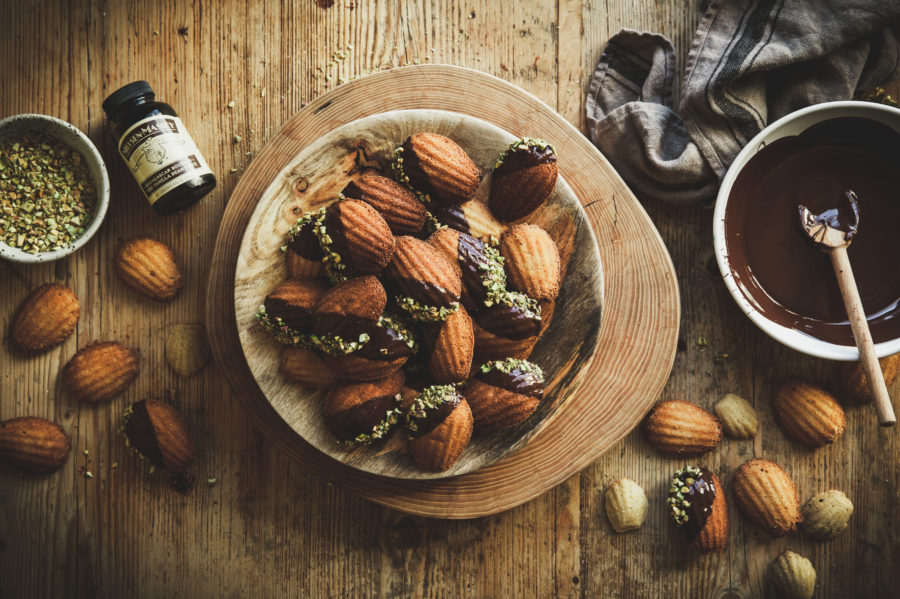
These Madeleines are flavored with nutty browned butter, cozy warm vanilla, and fragrant orange zest. The combination of all three flavors is magical. These cakes are snappy and crisp on the outside while the center is rich and dense – I’ve added a bit of almond flour to the batter because I felt like it really helped give these Madeleines the perfect texture. Feel free to use all-purpose flour entirely, if you like.
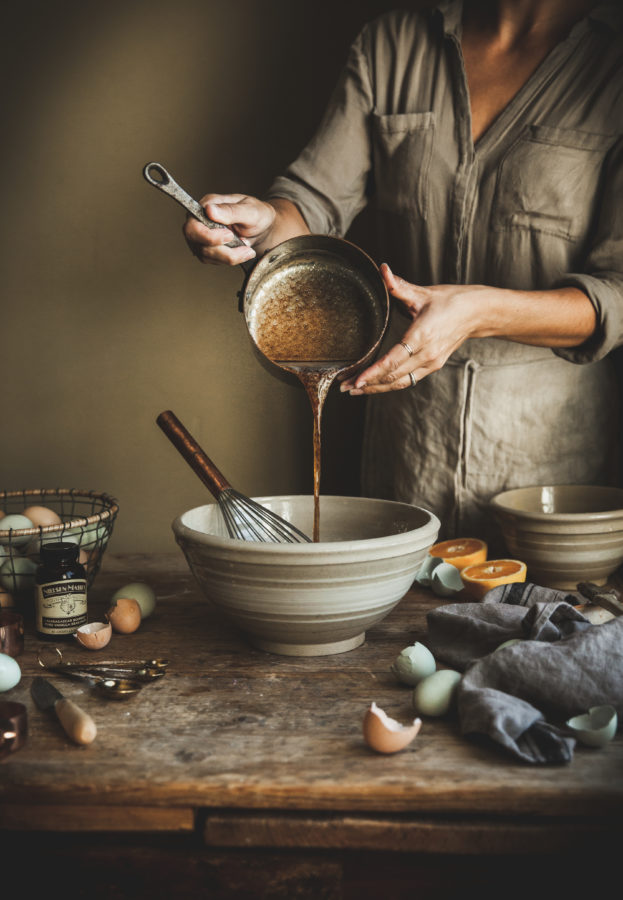
Adding browned butter to baked goods can change flavor profiles entirely. I have a bit of an obsession with it, honestly. When butter is melted and continued to be cooked, the milk solids brown and develop the most alluring nutty aroma. If you’ve never browned butter before, BetterYourBake.com has all details you need to produce a perfect saucepan full of this liquid gold.
PRO TIPS FOR BROWNING BUTTER:
- To check the level of doneness in your butter, clear away a bit of foam and spoon a bit of browned milk solids onto a white plate to check for color.
- Take evaporation into account – browned butter reduces in volume by 20-25 % as the water cooks off.
- Browned butter lasts for 1-2 weeks when refrigerated. To make it last longer, freeze it in an airtight container for up to three months.
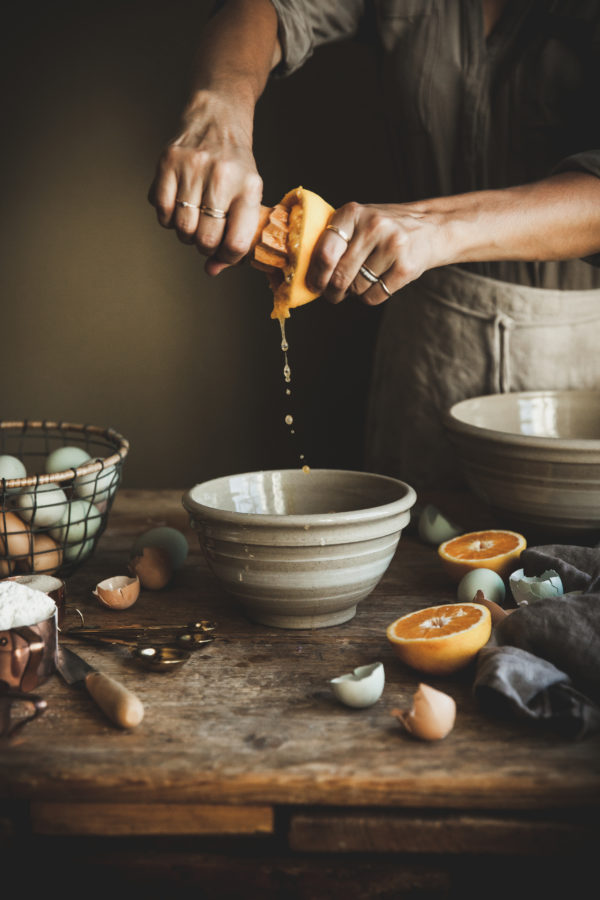
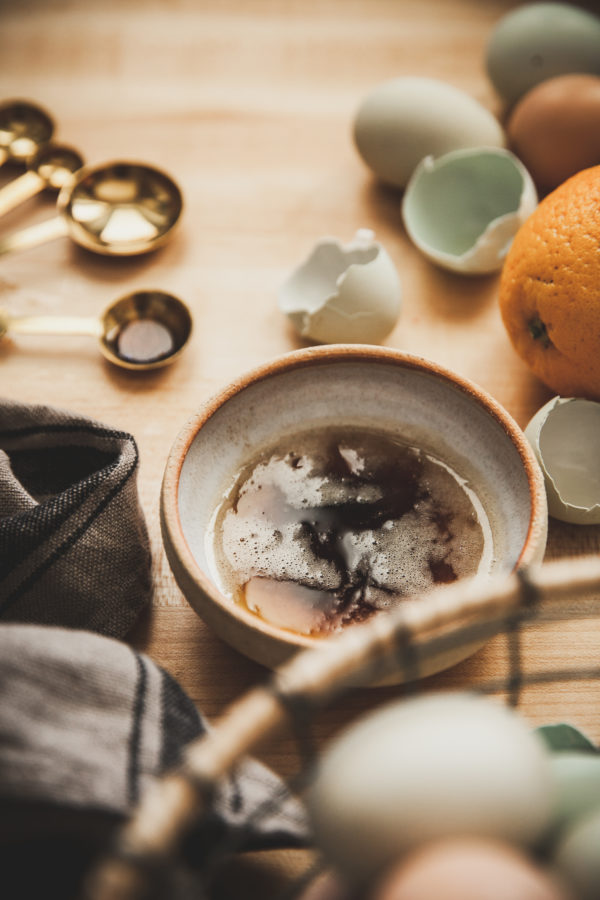
Orange zest and orange juice brighten up the Madeleines and provide a nice foil to the rich butter and vanilla flavors.
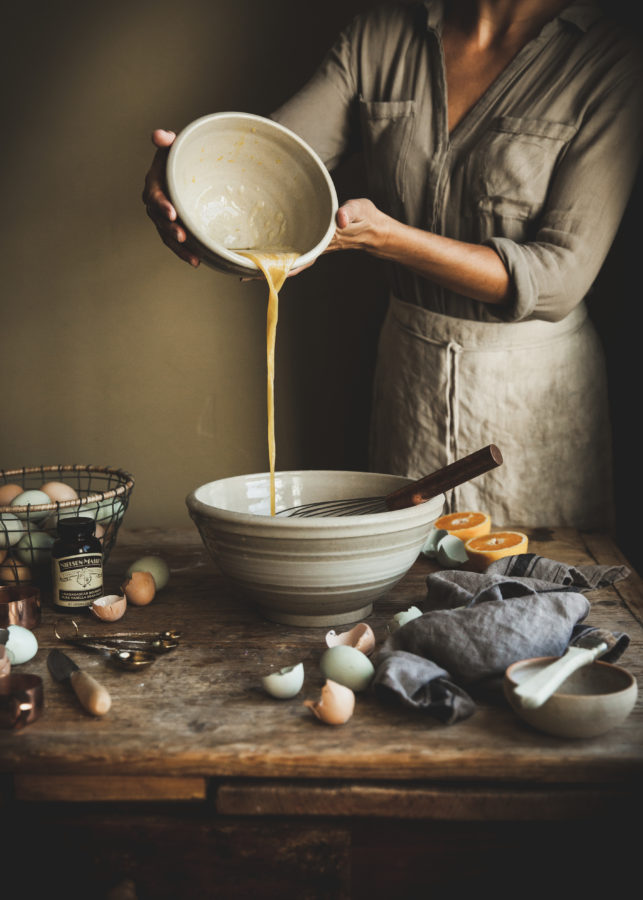
Unlike many cake recipes, the butter is added in last when making Madeleines.
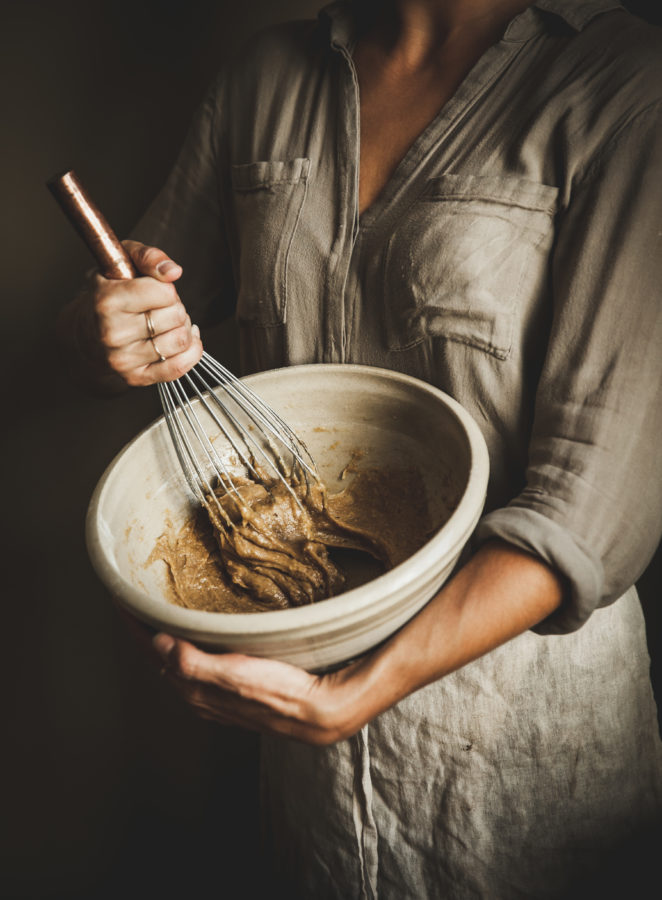
The dry ingredients are combined with the eggs and flavorings, then the browned butter is carefully mixed in. Be sure to be careful that the batter isn’t overmixed – overmixing creates tough cake!
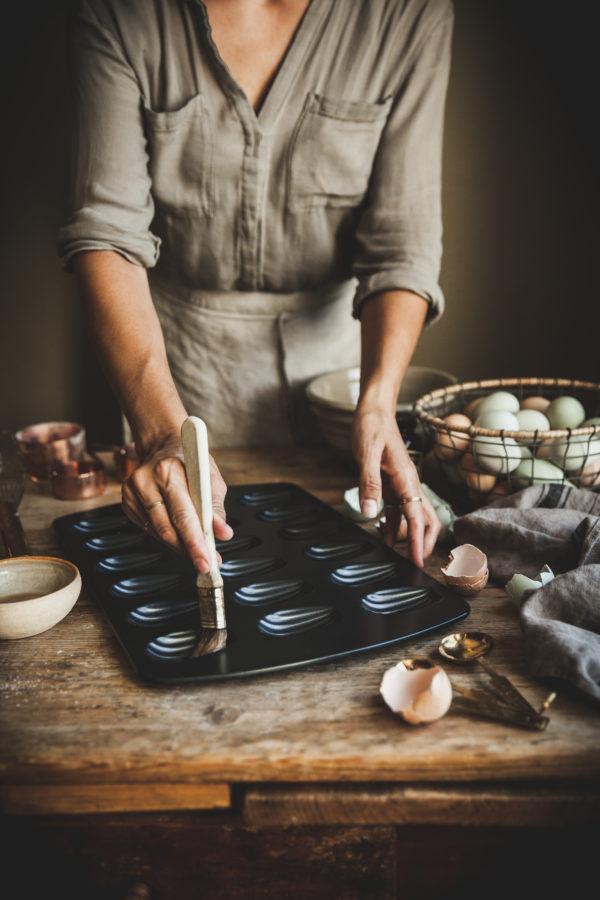
Another important step in making Madeleines is making sure that the batter has had enough time to rest and that both the batter and the greased molds are very cold. Cold molds and cold batter seem to help the Madeleines develop a larger “bump” on the top of the cakes (the side that is not baked against the shell-like ridges), and therefore produce a better overall texture.
Read through the recipe thoroughly before beginning to bake so that you can give all the steps the amount of time needed to be correctly completed.
PRO TIPS FOR FILLING BAKING MOLDS:
-
Stabilize your silicone: Use a metal baking sheet underneath silicone molds to increase stability. This also makes it easier to transport the molds in and out of the oven.
-
Removing baked goods: If your cakes or cookies have a hard time sliding out, carefully run a small butter knife along the edges of the baked good to loosen it before trying again.
-
Mold intricate cookies: Using a thicker batter like cookie dough? Roll a small ball of cookie dough between your fingertips and press it into the most detailed part of the mold. Insert more pieces of dough until the mold is slightly less than full. Freeze cookies in mold for ten minutes before baking.
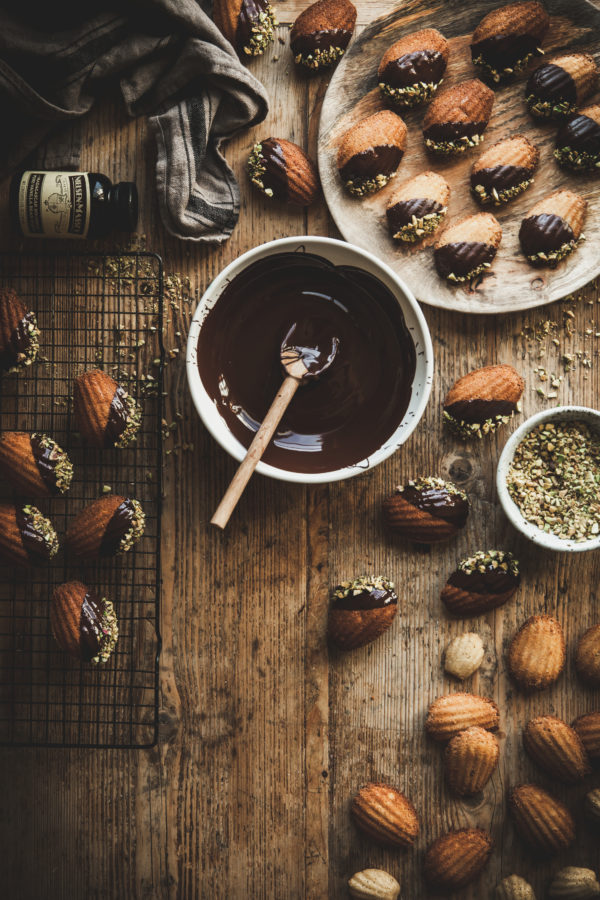
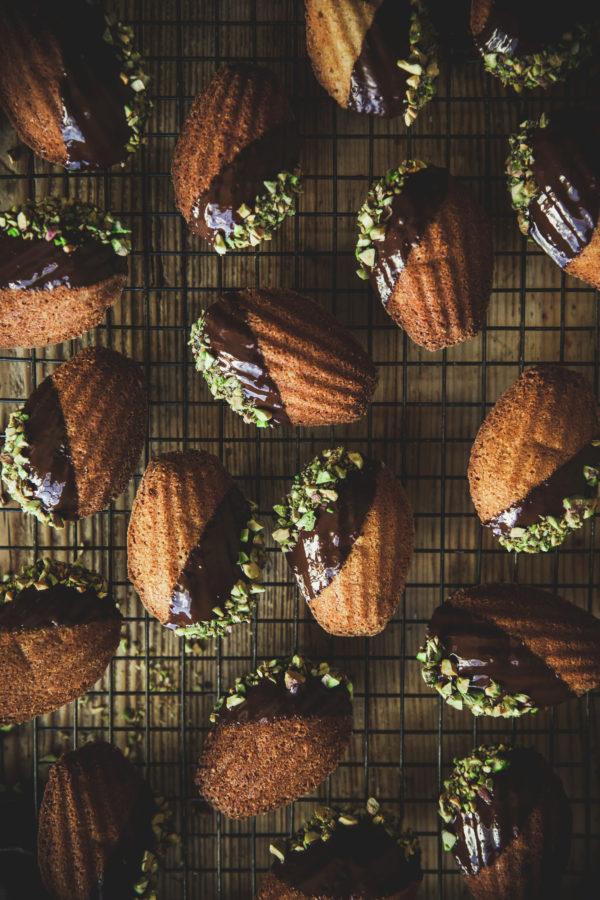
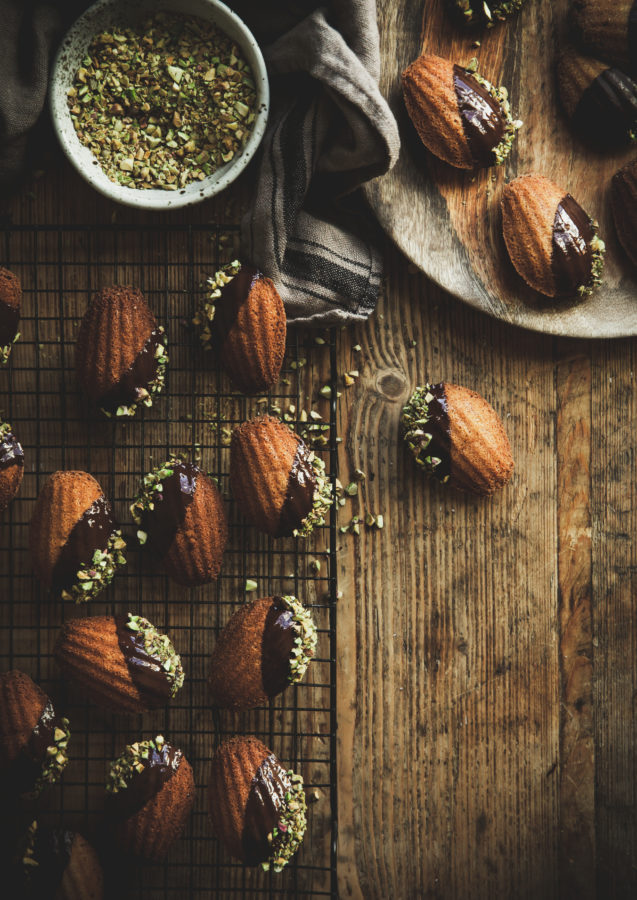
These Madeleines are perfect on their own, with just a light dusting of powdered sugar. We are taking things up a notch and dipping them in dark chocolate.
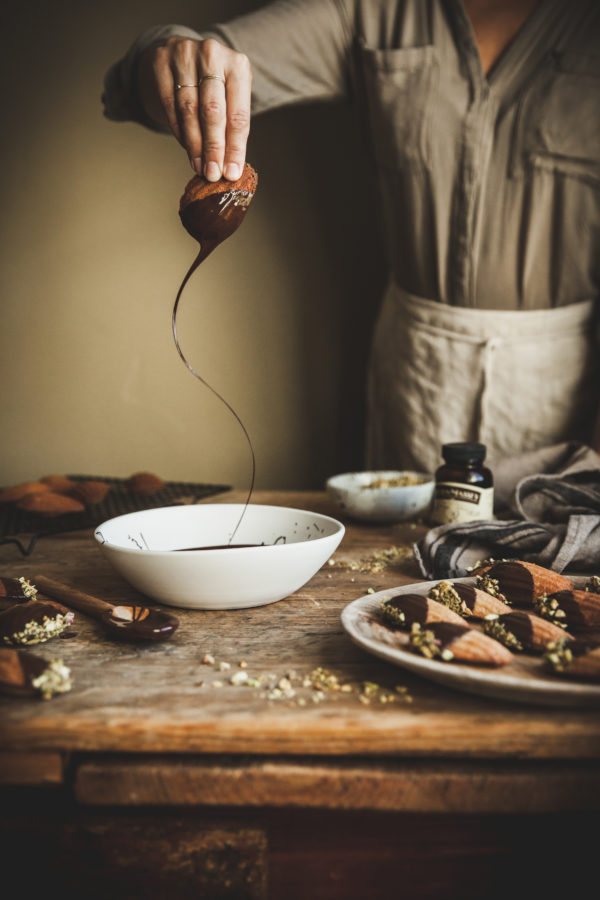
Tempering the chocolate before dipping stabilizes it. Generally, chocolate is tempered when it is used for special occasions where you want a smooth, glossy chocolate coating that dries shiny and has a crisp snap when you bite into it.
The art of tempering chocolate is a process that uses heating and cooling to control and compose a network of stable crystals. To master this technique on your stovetop, you’ll rely on a combination of temperature and time, through a process called seeding.
Whether you’re dipping cake pops or making chocolate molds, you’ll keep a cool temper doing this at home!
PRO TIPS FOR TEMPERING CHOCOLATE:
- Partially melting the chocolate before stirring prevents large clumps of solid chocolate from sticking together.
- Final temperatures vary by type of chocolate. Final temperatures vary by chocolate type: Dark chocolate should be heated to 89°F (32°C), milk chocolate should be heated to 86°F (30°C) and white chocolate should be heated to 84°F (29°C).
Madeleines are at their best on the day that they are baked. The outer texture should be crisp while the inside should be cakey and moist. They will still be delicious after the first day, of course. The texture simply won’t be the same.
Feel free to try dipping these in another type of chocolate, if you prefer (I think white chocolate would be awfully nice) and change up the nuts if pistachios aren’t your thing – endless combinations await anyone who wants to play around a bit!
For more detailed tips and tricks, along with several other baking tips and techniques, head over to BetterYourBake.com .
- FOR THE MADELEINES:
- 10 tablespoons Unsalted Butter
- ⅔ cup Sugar
- ⅔ cup + 2 teaspoons All-purpose Flour
- ⅓ cup Almond Flour
- 2 large Eggs
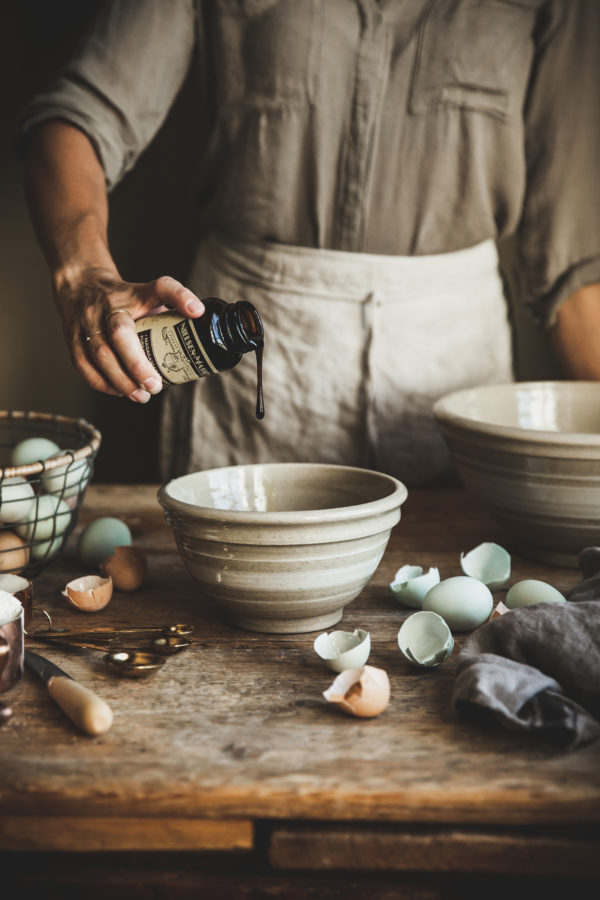
- 1 teaspoon Nielson-Massey Madagascar Bourbon Pure Vanilla Bean Paste
- pinch of Salt
- zest of ½ an Orange
- 1 tablespoon Orange Juice
- FOR THE CHOCOLATE PISTACHIO GARNISH:
- 1 cup 60-70% cacao content Chocolate, chopped (chips work, as well)
- ⅓ cup Pistachios, finely chopped
- FOR THE MADELEINES:
- First, brown the butter. Cut the butter into even sized cubes and place in a light-colored saucepan. Place the saucepan over medium-high heat.
- Use a whisk or spatula to gently swirl the butter around the pan to help it melt evenly.
- Stir frequently to prevent milk solids from sticking to the saucepan.
- As soon as the butter has developed a toasty, golden brown color and gives off a nutty aroma, remove from heat. Let cool for 10 minutes before using.
- Take 2 tablespoons of the browned butter and place it in a small bowl. Add 2 teaspoons of all-purpose flour to the butter and stir in until smooth - set aside to be used for coating your madeleine molds.
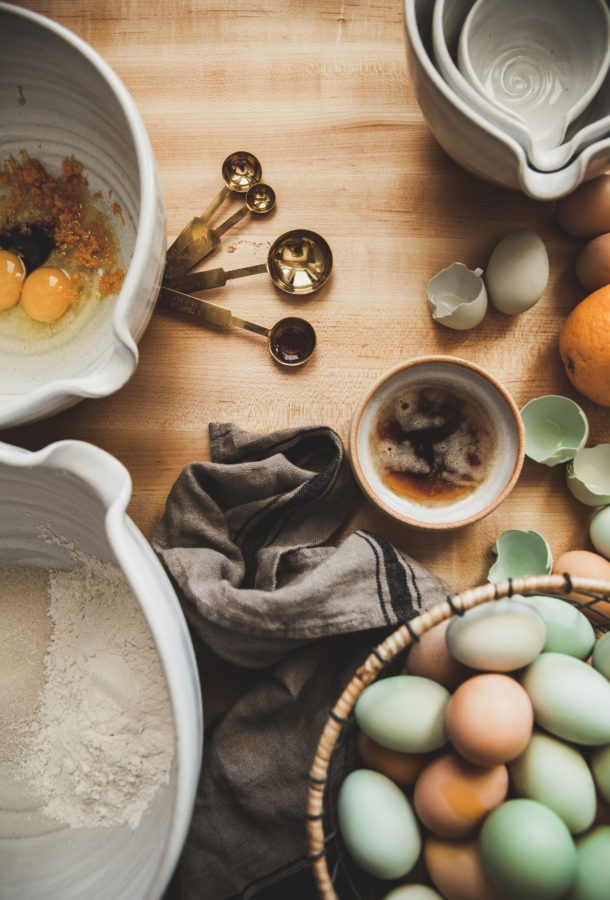
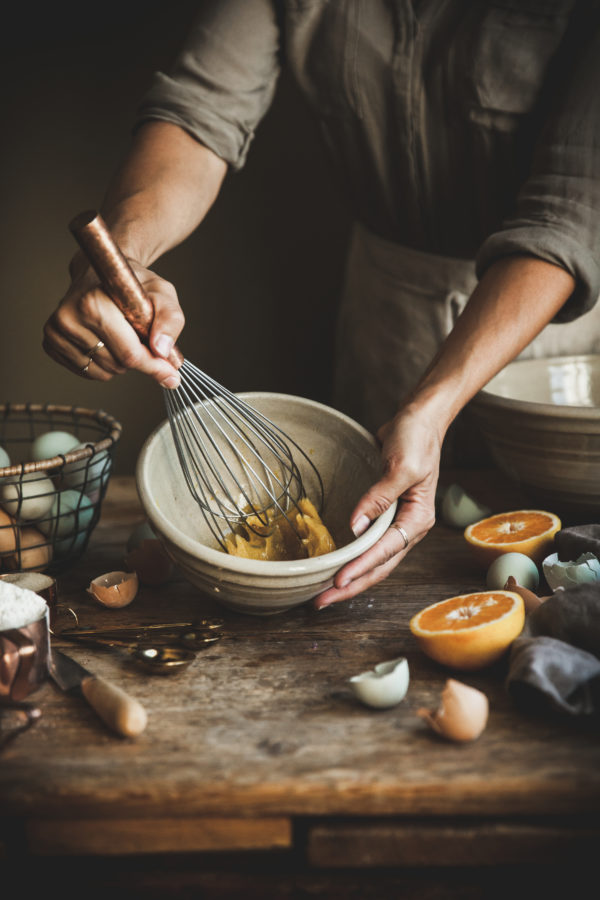
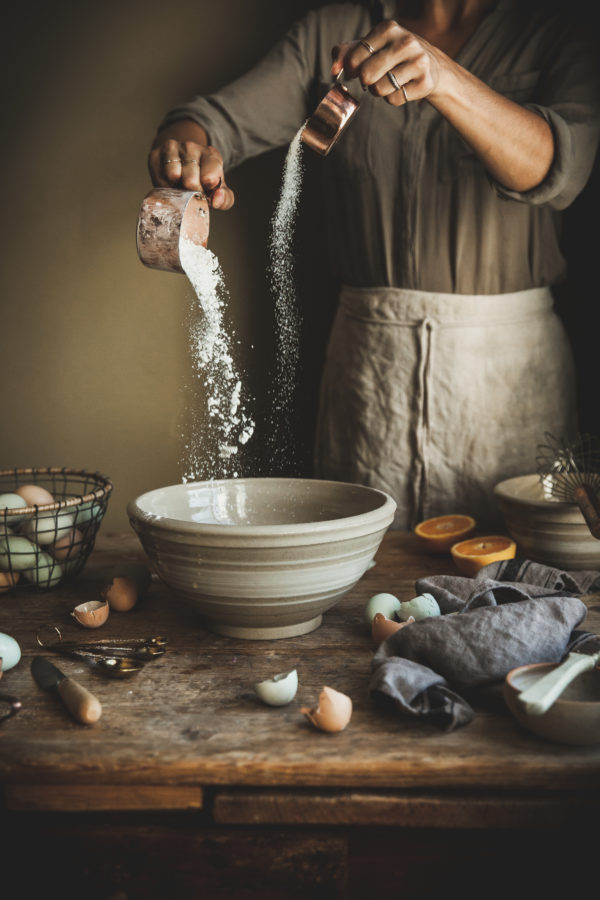
- Place the ⅔ cup all-purpose flour, almond flour, sugar, and salt in a mixing bowl. Whisk to combine and set aside.
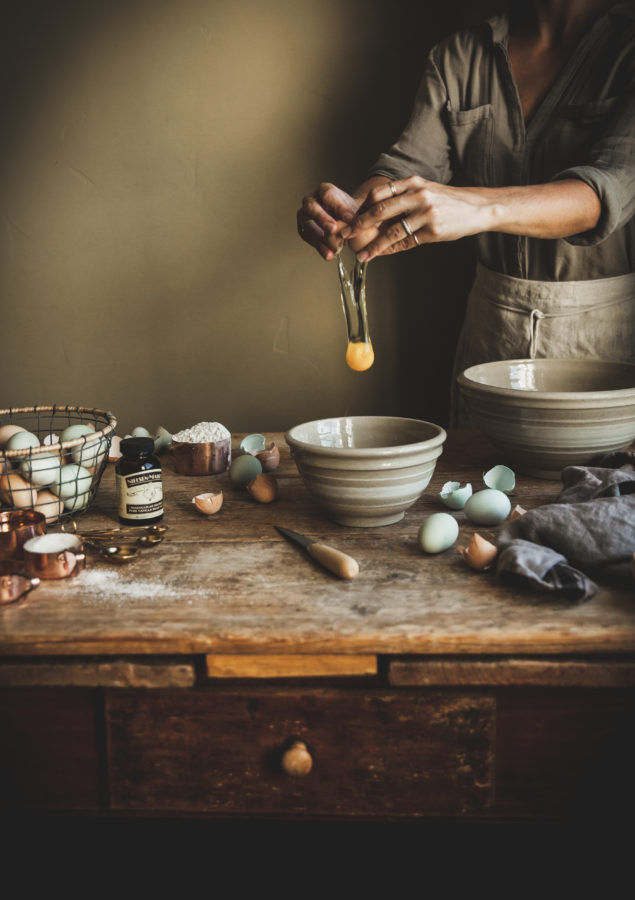
- In another mixing bowl, add the eggs, vanilla bean paste, orange zest, and orange juice and whisk until the eggs are frothy.
- Pour the egg mixture into the bowl of dry ingredients along with ⅓ of the browned butter. Whisk together until just combined. Mixture will be thick. Pour in the rest of the browned butter and whisk in again, until just combined. Do not overmix. Cover the dough and place it in the refrigerator to rest for at least 1 hour or overnight.
- TO BAKE:
- Brush the shell-like indentations of a Madeleine mold with the browned butter/flour mixture you set aside earlier - you may need to microwave it just a little if it has solidified - it should be in liquid form. Keep the butter mixture from being brushed outside of the shell shapes so that the batter won't be as prone to spreading beyond it's borders.
- Preheat the oven to 350 degrees.
- Place the baking mold in the freezer for 1 hour.
- Once the mold is well frozen, scoop heaping tablespoons of the chilled and rested Madeleine batter into each shell indention.
- Bake in the preheated oven for 10-12 minutes, rotating pan halfway through.
- The Madeleines are done with the tops are puffed and spring back when touched. Edges should be golden brown.
- Let the Madeleines cool for 1 minute, then use a fork to gently loosen them and remove from the molds. Place on a cooling rack, decorative side-up.
- TO TEMPER THE CHOCOLATE AND GARNISH:
- Place ¼ cup of the chocolate in the refrigerator. Place the remaining chocolate in a small, dry, heat proof bowl.
- Fill a saucepan with 1-2 inches of water and bring to a simmer. Create a double boiler by placing the shallow, heat proof bowl over the saucepan.
- Let the chocolate sit over the hot water until it is about ⅔ melted. Don't let the water splash or touch the chocolate because it will cause it to seize.
- Once the chocolate is ⅔ of the way melted, gently stir to prevent burning and allow it to continue to melt until it reaches 115 degrees F. Use a candy thermometer to check the temperature of the chocolate. Remove the bowl of melted chocolate from the saucepan and set aside.
- Add the refrigerated ¼ cup of chocolate to the melted chocolate, stirring constantly, until all of the chocolate has melted, and the temperature reaches 79 degrees F.
- Raise the temperature of the chocolate by placing it back over the saucepan until the thermometer reads 89 degrees F.
- The chocolate should now set to a glossy finish with a satiny texture.
- While holding the bottom, dip the cooled Madeleines partially in the tempered chocolate. While still holding the Madeleine upside down, tap or shake it so that any excess chocolate will drizzle back down into the bowl. Dip the top of the chocolate covered Madeleine into the chopped pistachios and place on a sheet of parchment paper to set.
- Madeleines are best eaten on the day that they are baked. Store extras in an airtight container.
Leave a Reply