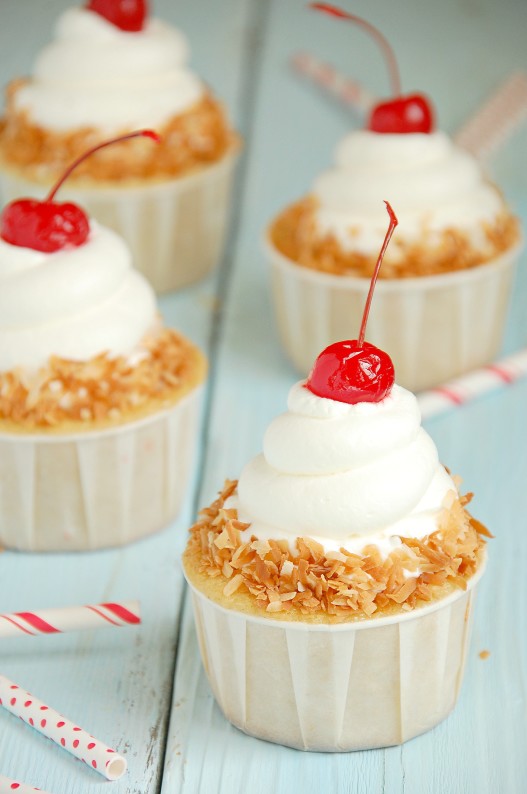
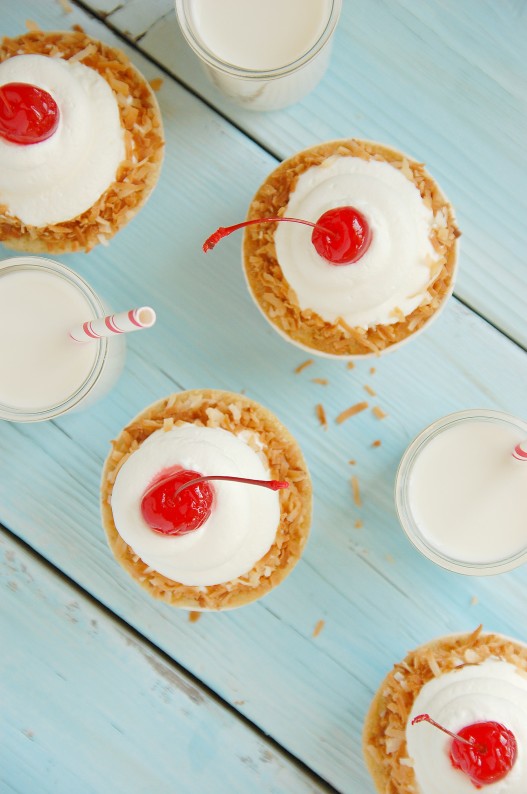
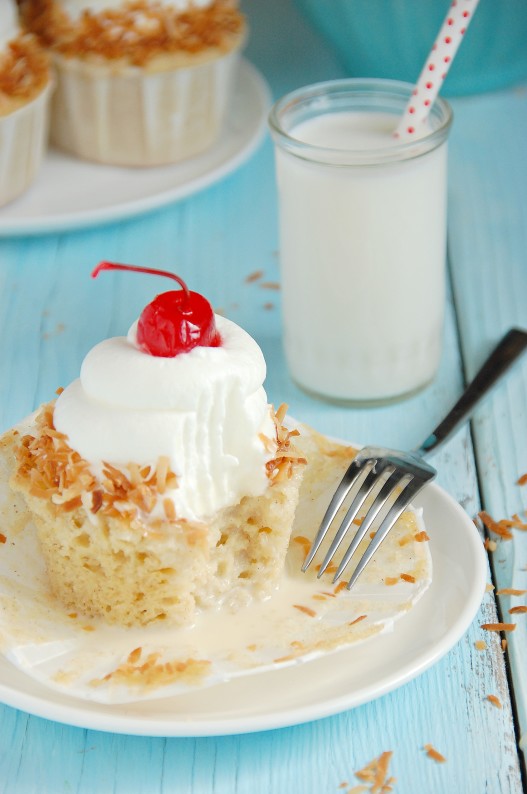
These tres leches cupcakes are one of my favorite cupcakes of all time. Dense, lightly cinnamon spiced cake is soaked with three different types of milk, chilled, and topped with an exorbitant amount of whipped cream and sweet, crunchy, toasted coconut. I love cold, creamy cupcakes, especially when they involve heavy cream and maraschino cherries.

You’ll need to plan a little bit ahead for these cupcakes. They need time to chill in the fridge, so that all of those milks have a good chance to soak into every nook and cranny. Give yourself at least 4-5 hours before you need to serve them.
If you want a little more coconut flavor in your cupcake, switch out the heavy cream in the milk mixture for canned coconut milk. I’ve tried it both ways and both are delicious.
Do note that these cupcakes are best baked in large liners. I used liners that hold about 1 C. in volume, giving my about 16 cupcakes total. These types of liners can just be set on top of a baking sheet, you don’t need a muffin tin to bake them in. These large liners are thicker, which keep the milk from leaking through. Also, take care to not fill the liners any more than half full with batter, as it will overflow if you do.
Poke a LOT of holes in your cooled cupcakes. I put as many holes as I can fit without breaking up the cake. The more holes, the more milk will be able to soak in, and you want that. You really want that to happen.
- FOR THE MILK MIXTURE:
- 1 14oz can sweetened condensed milk
- 1 12 oz can evaporated milk
- 1 cup heavy cream
- 1 tsp vanilla extract
- FOR THE CUPCAKES:
- 2 C. Flour
- 1½ t. Baking powder
- 1 t. Salt
- ½ t. Cinnamon
- 8 T. Butter(1 stick)
- 1 C. Whole Milk
- 4 lg Eggs, room temp
- 2 C. Sugar
- 2 t. Vanilla
- 2 C. Heavy Whipping cream
- ¼ C. Sugar
- ½ C. Shredded Sweetened Coconut
- 16 Maraschino Cherries
- For the Milk Mixture:
- Pour the Sweetened Condensed Milk into a very large, microwave safe bowl. Make sure the bowl is very large because the milk will bubble up and over if it is not big enough.
- Microwave the milk for 12 minutes, taking out and stirring at 3 minute intervals(will be very hot!).
- Stir in the evaporated milk, heavy cream, and vanilla.
- Set aside.
- For the cupcakes:
- Preheat the oven to 325 degrees.
- Line 2 cupcake tins with cupcake liners. Large, 1 C. liners work best, but regular will work as well. If using regular liners, you will need about 24. If using large, 1 C. liners, you will need 16.
- In a mixing bowl, stir together the flour, baking powder, salt, and cinnamon.
- Place the butter and whole milk in a saucepan and heat on medium until the butter has completely melted. Set aside.
- In a large mixing bowl, beat together the eggs. Add the sugar and beat together until glossy and pale yellow, about 5 minutes.
- Add in half of the flour mixture and mix in. Add in half of the milk/butter mixture and mix in. Mix in the remaining flour mixture and then the remaining milk mixture, mixing until just combined.
- Divide the batter between the cupcake liners, making sure to keep them under half full. If they are filled more than half full, the batter will overflow when cooked.
- Bake in the preheated oven for 12-15 minutes(longer for larger cupcakes) or until the tops are set and a toothpick inserted in the center of the cupcake comes out clean.
- Let the cupcakes cool for a few minutes, then poke a large amount of holes in each cupcake, using a wooden skewer. The more holes you poke, the more milk will be able to soak in.
- Pour a few Tablespoons of milk mixture over each cupcake, letting each spoonful soak in before adding more and dividing the milk mixture evenly between the cupcakes.
- Refrigerate the cupcakes and allow the milk to really soak into the cupcake, at least 3 hours.
- To Top The Cupcakes:
- Preheat the oven to 400 degrees. Spread the coconut in an even layer over a baking sheet.
- Place the baking sheet on the top rack of the oven and watch VERY closely. The coconut will brown quickly. If you notice it browning some areas of the coconut more heavily than other areas, remove from the oven and stir the coconut and shake and tap it to spread it out evenly again. Place back in the oven and continue toasting.
- When most of the coconut is a light brown, remove from oven and allow to cool.
- Place the heavy cream and ¼ C. Sugar in a mixing bowl and beat on high speed until stiff peaks form. Place whipped cream in a piping bag and pipe a swirling of cream on top of each chilled cupcake.
- Coat the sides of the whipped cream with toasted coconut and top with a maraschino cherry.
- Serve Chilled.
Recipe adapted from Step by Step Gourmet.


These cupcakes look delicious and perfect for a summer treat
Thank you Rochelle! They are super tasty!
The coconut in this has me dying this morning. It’s time for breakfast but I would rather have these than anything. Love them!
Thank you Matt! I hear you…the morning after I made these I think I ate three for breakfast!
they look wonderful!
Thank you Dina!
What pretty cupcakes! Your photos are just gorgeous! I still have never made tres leches cake, and these cupcakes look like the right recipe to start with!
Thank you so much, Kristine! You’ve got to try tres leches, these cupcakes are one of my all time favorites!
Oh my goodness! You have no idea how badly I want one of these right now! And they are just so pretty too! I love tres leches cake, my all-time fave, and in cupcake form? Almost too good to be true!
Thanks Crystal! I totally hear you, I am craving one right now too! Well, make that always.
These sound and look heavenly! I hope I get to try these soon 🙂
Thank you Megan! I hope you get to try them soon too!
What kind of flour we have to use ?
Just all-purpose will work great!
Do the little t.s in the cupcake portion of the recipe stand for teaspoons? I noticed you used tsp in the milk mixture. just want to make sure I get these right for my boyfriend’s birthday!
Yep! A t = teaspoon and T = tablespoon =)